
1、集成
整合前注意版本问题,SpringBoot版本要小于2.6,这里的版本是2.2.x。
SpringBoot: 2.2.13.RELEASE
swagger: 2
第一,添加依赖:
<dependency>
    <groupId>io.springfox</groupId>
    <artifactId>springfox-swagger2</artifactId>
    <version>2.9.2</version>
</dependency>
<dependency>
    <groupId>io.springfox</groupId>
    <artifactId>springfox-swagger-ui</artifactId>
    <version>2.9.2</version>
</dependency>
然后,添加配置类:
package com.xx.swagger;
import org.springframework.context.annotation.Bean;
import org.springframework.context.annotation.Configuration;
import springfox.documentation.builders.ApiInfoBuilder;
import springfox.documentation.builders.PathSelectors;
import springfox.documentation.builders.RequestHandlerSelectors;
import springfox.documentation.service.Contact;
import springfox.documentation.spi.DocumentationType;
import springfox.documentation.spring.web.plugins.Docket;
import springfox.documentation.swagger2.annotations.EnableSwagger2;
@Configuration
@EnableSwagger2
publicclass SwaggerConfig {
@Bean
public Docket createRestApi() {
returnnew Docket(DocumentationType.SWAGGER_2)
.pathMapping("/")
.select()
.apis(RequestHandlerSelectors.basePackage("com.xx.controller"))
.paths(PathSelectors.any())
.build().apiInfo(new ApiInfoBuilder()
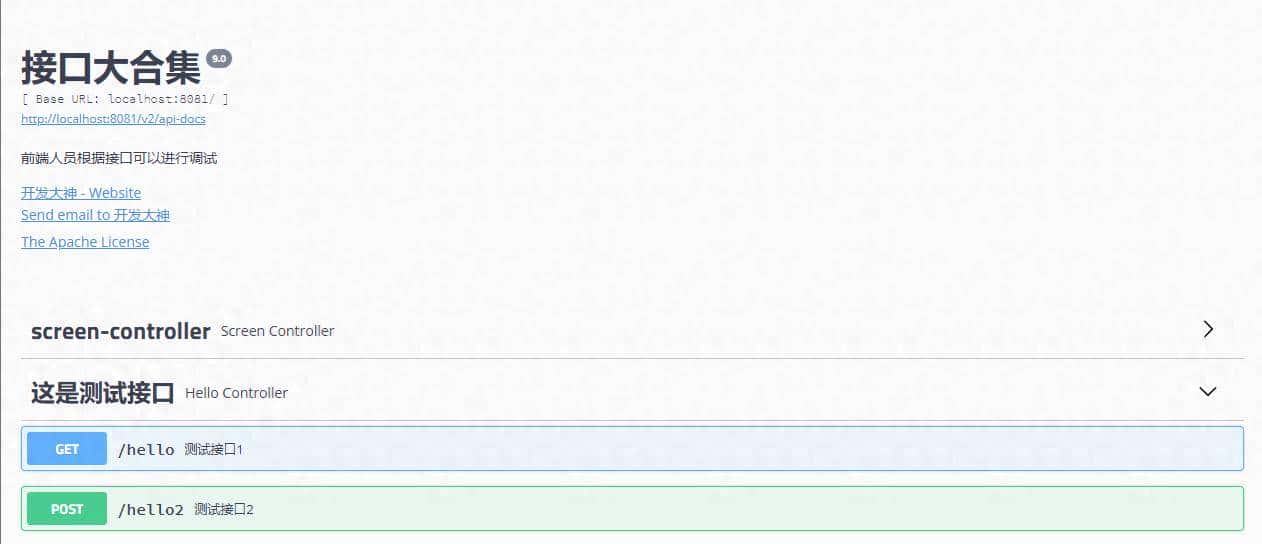
.title("接口大合集")
.description("前端人员根据接口可以进行调试")
.version("9.0")
.contact(new Contact("开发大神","http://xxx","123@qq.com"))
.license("The Apache License")
.licenseUrl("http://www.baidu.com")
.build());
}
}也可以把@EnableSwagger2放在启动类上。
由于加在了这里,所以启动类上就不用加了。
2、简单使用
整合完后就可以开始使用了,在controller下编写。
前面增加@Api
@RestController
@Slf4j
@RequiredArgsConstructor
@Api(tags = "这是测试接口")
public class HelloController {
方法上添加:
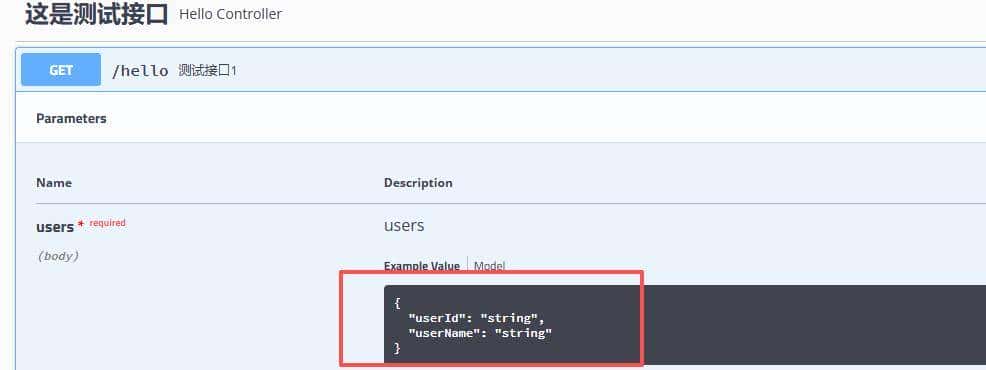
@GetMapping("hello")
 @ApiOperation("测试接口1")
 public Map<String, Object> hello(@RequestBody Users users) {
Users类添加如下内容
@Data
@ApiModel
public class Users implements Serializable {
   @ApiModelProperty(value = "用户id")
   private String userId;
   @ApiModelProperty(value = "用户名")
   private String userName;
}
第二个接口方法:
@PostMapping("hello2")
@ApiOperation("测试接口2")
@ApiImplicitParams({
	@ApiImplicitParam(name = "userId", value = "用户ID", required = true)
})
@ApiImplicitParam(name = "id", value = "用户id", defaultValue = "99", required = true)
public R<?> hello2(@RequestParam Integer id) {
访问地址:
http://localhost:8081/swagger-ui.html#/
这个端口是我们应用的端口号。
效果如下:
具体详情:
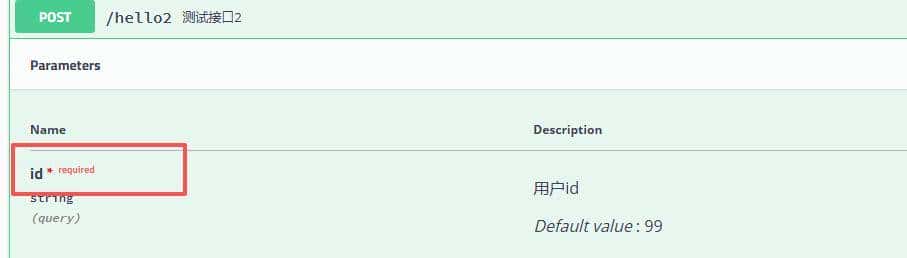
如果是body,还会提供json例子。
© 版权声明
文章版权归作者所有,未经允许请勿转载。如内容涉嫌侵权,请在本页底部进入<联系我们>进行举报投诉!
THE END


暂无评论内容