

前言
在如今的 web 程序中,WebSockets 被用来实现需要实时、即时更新的接口。当服务器上的数据被更新后,更新信息将通过 WebSocket 连接发送到客户端等待处理。相比于页面使用定时器不停地轮询的程序,WebSocket 是一种更加可靠和高效的选择。
Laravel通过Broadcasting可以使用如今时下很热的Websocket技术。 Broadcasting允许你在服务端代码和客户端 JavaScript 应用之间共享一样的事件名。
环境参数
- Redis 7.0.0
- PHP8.0
- Laravel 8.5
广播架构
查阅目前有多种种广播机制可供选择:我们使用 Redis + socket.io 这种方案。
相关信息
- laravel-echo-server:使用 socket.io 机制实现的 broadcasting 服务端
- laravel-echo:laravel-echo是 laravel broadcasting 的客户端。注意,laravel-echo 并不是 laravel-echo-server 专属的客户端, laravel-echo 有两种连接机制可以选:pusher 和 socket.io 。 而 laravel-echo-server 是开发出来专门用于 socket.io连接的服务端。如果你使用的是 pusher,那么不需要使用 laravel-echo-server ,但是你依然要使用 laravel-echo
- Socket.IO:websocket 的一种nodejs实现。laravel-echo 如果要使用socket.io 则需要先安装 socket.io-client。
- Predis:redis客户端的php实现,如果要使用redis作为广播机制的实现,则需要先安装 predis
- Laravel Event:广播事件类
- Laravel Queue:广播机制是基于queue机制来实现的
- Redis Sub/Pub:Redis的订阅机制。laravel-echo-server本质上只是一个Redis订阅服务的订阅者。
流程图及过程
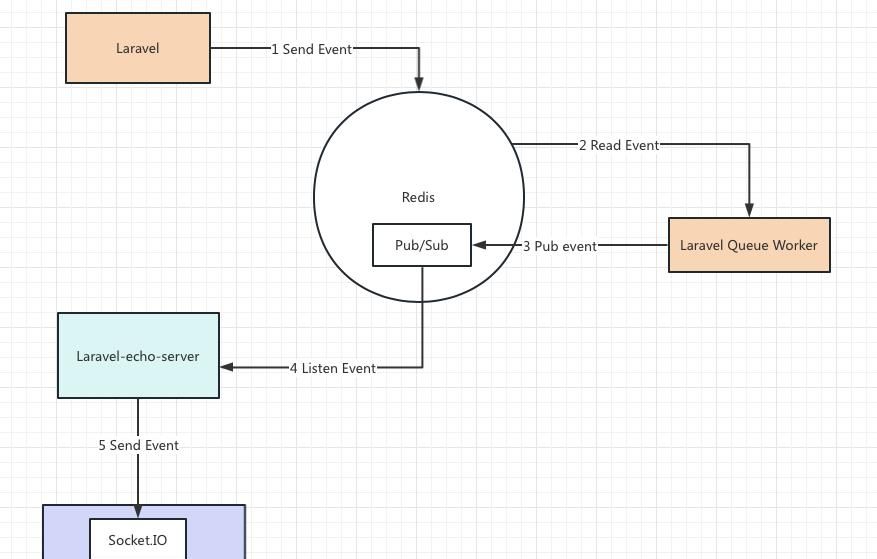
- Laravel 通过 broadcasting 机制发布一个Event对象到Redis
- Laravel Queue Worker 读取该Event对象,并使用Redis的Sub/Pub机制将该 Event对象发布出去
- laravel-echo-server 通过 Redis 的 Sub/Pub机制收听到该 Event
- 由于 laravel-echo 使用 socket.io 跟 laravel-echo-server相连接。所以 laravel-echo 会通过socket.io将Event对象发送给laravel-echo
- laravel-echo解析通过 socket.io接收到的 Event对象
广播事件种类
- public:谁都可以收听的广播
- private:只有指定用户可以收到的广播
- presence:不仅可以收听到跟你有关的广播,还可以跟别的用户互动,适合做聊天室
demo 示例构建
1.假设场景
假设我们要使用laravel作为服务端做外卖商家订单推送系统。商家打开页面后不需要刷新页面即可不断的获取到最新的订单通知。
2.建立广播服务
注册 BroadcastServiceProvider,打开 config/app.php 找到 'provides' 属性,将 BroadcastServiceProvider 前的注释去掉,如下代码示例(app.php 部分代码):
 // Package Service Providers...

 // Application Service Providers...
 AppProvidersAppServiceProvider::class,
 AppProvidersAuthServiceProvider::class,
 // AppProvidersBroadcastServiceProvider::class, # 去掉注释
 AppProvidersEventServiceProvider::class,
 AppProvidersRouteServiceProvider::class,
3.设置广播路由
<?php

use IlluminateSupportFacadesBroadcast;

/*
|--------------------------------------------------------------------------
| Broadcast Channels
|--------------------------------------------------------------------------
|
| Here you may register all of the event broadcasting channels that your
| application supports. The given channel authorization callbacks are
| used to check if an authenticated user can listen to the channel.
|
*/

Broadcast::channel('App.User.{id}', function ($user, $id) {
    return (int) $user->id === (int) $id;
});

# 该channel永远返回true意味着无论收听者是谁,他都会收听到最新的广播。
Broadcast::channel('test_notification', function () {
    return true;
});
4.设置Redis连接
由于广播机制是基于queue机制实现的。所以queue的存储设置会直接决定广播事件的存储位置。编辑 .env 文件,修改 QUEUE_DRIVER = redis
QUEUE_DRIVER=redis5.建立Event
php artisan make:event Notification6.测试广播
项目根目录下的 app 文件夹中会多出来一个 Events目录,该目录下产生了广播事件类 Notification.php文件。
针对刚生成Notification类进行如下修改:
增加对 ShouldBroadcast 的实现
修改broadcastOn 方法,使用公共广播通道 test_notification
修改构造函数
<?php

namespace AppEvents;

use CarbonCarbon;
use IlluminateBroadcastingChannel;
use IlluminateQueueSerializesModels;
use IlluminateBroadcastingPrivateChannel;
use IlluminateBroadcastingPresenceChannel;
use IlluminateFoundationEventsDispatchable;
use IlluminateBroadcastingInteractsWithSockets;
use IlluminateContractsBroadcastingShouldBroadcast;

class Notification implements ShouldBroadcast  // 1. 事件是要广播出去的
{
    use Dispatchable, InteractsWithSockets, SerializesModels;

    public $message;

    /**
     * Create a new event instance.
     *
     * @return void
     */
    public function __construct($message)  // 2.广播出去的内容
    {
        $this->message = $message;
    }

    /**
     * Get the channels the event should broadcast on.
     *
     * @return IlluminateBroadcastingChannel|array
     */
    public function broadcastOn()  // 3.对那些频道进行广播
    {
        // 创建频道
        return new Channel('test_notification');
    }
}
7.Laravel Queue Worker消费Event
为项目增加 predis依赖,在项目根目录下执行:
composer require predis/predis新增一个artisan命令来测试是否可以将广播发送到 Redis中,编辑 routes/console.php ,增加 bignews 命令。
Artisan::command('testNotification', function () {
    broadcast(new Notification('news notification'));
    $this->comment("news notification");

});
执行 testNotification 命令:
$ php artisan testNotification

news notificatio
通过 redis-cli 查看当前redis中的数据,发现多出来一个queue对象
127.0.0.1:6379> keys *

1) "queues:default"
到此 Laravel的广播机制就成功的连接上了 Redis!
新开一个终端窗口,并在根目录下启动 Laravel Queue Worker
php artisan queue:work之前的终端窗口,再广播一个news Notification:
php artisan testNotification你可以在queue worker的执行界面看到该Event已经被检测到,并通过Redis Sub/Pub机制传播出去了
$ php artisan queue:work$ [2023-08-31 23:24:03][37] Processing: AppEventsNotification还记得之前通过Laravel广播事件之后redis中会产生一个 queue:default对象么?这次如果你快速的通过 keys * 命令查询redis中的对象,你会发现 queue:default 每次被产生出来就会迅速的被 queue worker消费掉
127.0.0.1:6379> keys *

1) "queues:default"

127.0.0.1:6379> keys *

(empty list or set)
Laravel Queue Worker连接成功!
8.laravel-echo-server 订阅Redis Sub
8.1 安装 laravel-echo-server
再新开一个终端窗口。由于我们之前已经开了两个终端窗口了,所以这是第三个终端窗口。
先切换到root用户,然后安装laravel-echo-server
npm install -g laravel-echo-server8.2 初始化
我们切换到项目根目录下,初始化 laravel-echo-server,所有问题都使用默认配置:
$ laravel-echo-server init
? Do you want to run this server in development mode? No
? Which port would you like to serve from? 6001
? Which database would you like to use to store presence channel members? redis
? Enter the host of your Laravel authentication server. http://localhost
? Will you be serving on http or https? http
? Do you want to generate a client ID/Key for HTTP API? No
? Do you want to setup cross domain access to the API? No
Configuration file saved. Run laravel-echo-server start to run server.

它会帮你在项目根目录下生成 laravel-echo-server.json 配置文件,默认配置
(下面我已经改过)为

{
	"authHost": "http://127.0.0.1:6001",
	"authEndpoint": "/broadcasting/auth",
	"clients": [],
	"database": "redis",
	"databaseConfig": {
		"redis": {
			"port": "6379",
			"host": "127.0.0.1"
		},
		"sqlite": {
			"databasePath": "/database/laravel-echo-server.sqlite"
		}
	},
	"devMode": true,
	"host": null,
	"port": "6001",
	"protocol": "http",
	"socketio": {},
	"secureOptions": 67108864,
	"sslCertPath": "",
	"sslKeyPath": "",
	"sslCertChainPath": "",
	"sslPassphrase": "",
	"subscribers": {
		"http": true,
		"redis": true
	},
	"apiOriginAllow": {
		"allowCors": false,
		"allowOrigin": "",
		"allowMethods": "",
		"allowHeaders": ""
	}
}
8.3 启动
执行以下命令启动 laravel-echo-server
$ laravel-echo-server start成功启动后会输出以下日志
我们再回到第一个终端窗口,再次广播一个news Notification。你会发现 laravel-echo-server 会输出以下日志
laravel-echo-server连接成功!
9.收听广播
$ npm i --save @hyoga/uni-socket.io

import io from '@hyoga/uni-socket.io';

const socket = io('wss://127.0.0.1:6001', {
  query: {},
  transports: [ 'websocket', 'polling' ],
  timeout: 5000,
  //设置最大重试次数
  reconnectionAttempts: 50,
  reconnectionDelay: 2000
});
console.log('ws');
socket.on('connect', () => {
  console.log(socket.id);
  console.log('ws 已连接');
  socket.emit('subscribe', {
    channel: 'test_notification',
    //auth: this.options.auth || {},
  });

  socket.on("AppEventsNotification", (...args) => {
    console.log('收到消息');
    console.log(args);
  });
});


暂无评论内容