
学习目标
能够使用function_score修改文档得分能够说出深度分页的方案能够使用Java Client实现高亮显示能够使用Java Client测试地理坐标查询能够使用Java Client测试聚合查询能够说出实现同义词的方案能够说出自动补全方案能够完善商城项目商品搜索功能能够实现商城项目自动补全功能
1 搜索高级
1.1. 修改文档得分
1.1.1 function_score
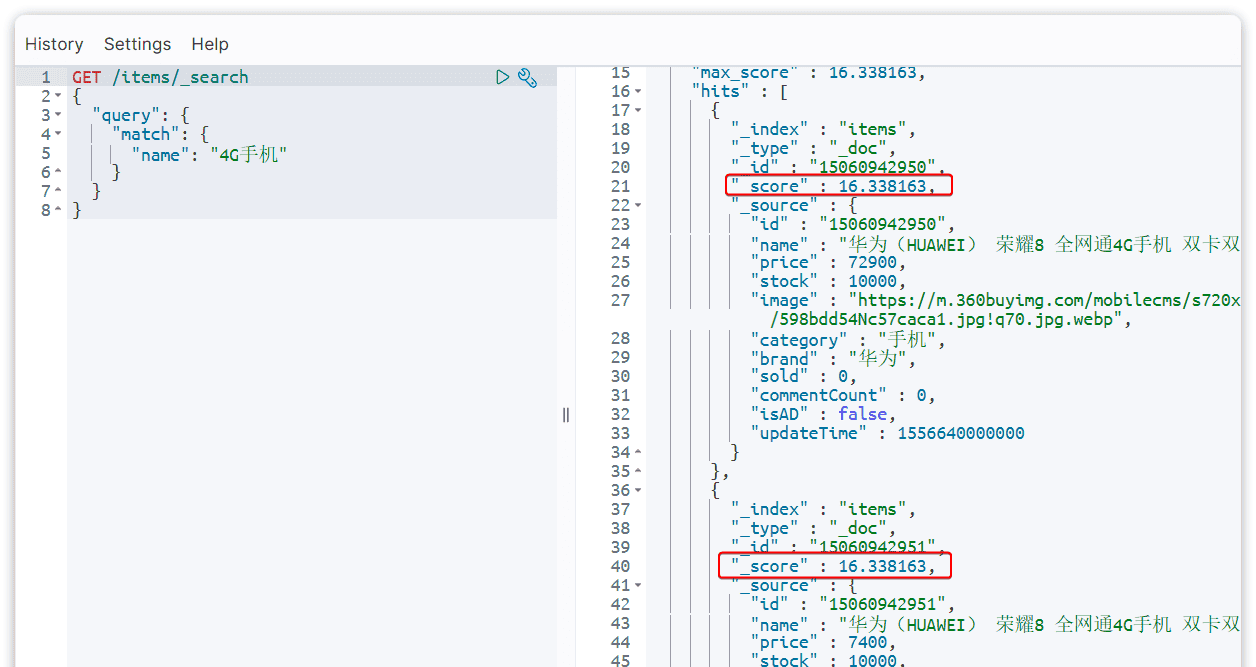
当我们利用match查询时,文档结果会根据与搜索词条的关联度打分(_score),返回结果时按照分值降序排列。例如,我们搜索 “手机”,结果如下:
_score:文档与用户搜索的关键字的相关度得分
在实际业务需求中,常常会有竞价排名的功能。不是相关度越高排名越靠前,而是掏的钱多的排名靠前。
例如在百度中搜索Java培训,排名靠前的就是广告推广:
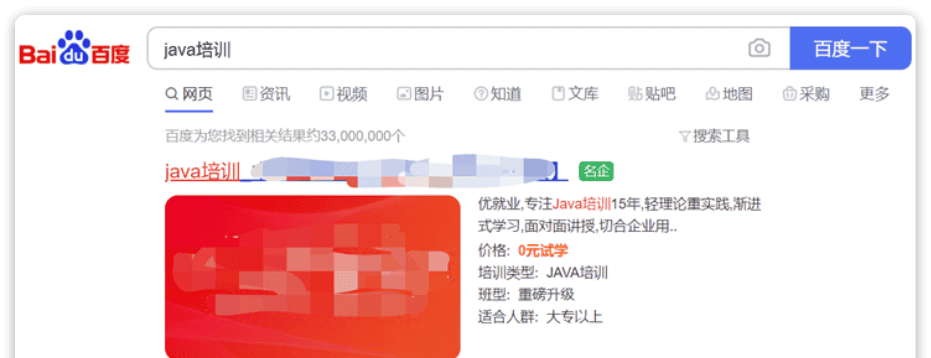
要想人为控制相关性算分,就需要利用elasticsearch中的function score 查询了。
一个例子:给小米这个品牌的手机算分提高十倍,分析如下:
过滤条件:品牌必须为小米算分函数:常量weight,值为10算分模式:相乘multiply
GET /items/_search
{
  "query": {
    "function_score": {
      "query": {
        "match": {
          "name":"手机"
        }
      },
      "functions": [
        {
          "filter": {
            "term": {
              "brand": "小米"
            }
          },
          "weight": 10
        }
      ],
      "boost_mode": "multiply"
    }
  },
  "from": 0,
  "size": 10
}
从结果可以看到小米手机排在前边,因为对品牌为“小米”的文档得分在原有分值基础上乘以10,分值越大越排在前边。function score的运行流程如下:
1)根据原始条件查询搜索文档,并且计算相关性算分,称为原始算分(query score)2)根据过滤条件,过滤文档3)符合过滤条件的文档,基于算分函数运算,得到函数算分(function score)4)将原始算分(query score)和函数算分(function score)基于运算模式做运算,得到最终结果,作为相关性算分。
因此,其中的关键点是:
过滤条件:决定哪些文档的算分被修改算分函数:决定函数算分的算法运算模式:决定最终算分结果
本例中function_score的语法如下:
function score 查询中包含四部分内容:
原始查询条件:query部分,基于这个条件搜索文档,并且基于BM25算法给文档打分,原始算分(query score)过滤条件:filter部分,符合该条件的文档才会重新算分算分函数:符合filter条件的文档要根据这个函数做运算,得到的函数算分(function score),有四种函数
weight:函数结果是常量field_value_factor:以文档中的某个字段值作为函数结果,适用于那些需要根据某个数值字段来影响文档排序的情况,例如根据产品的价格、文章的阅读量或者用户的活跃度来对结果进行评分。random_score:以随机数作为函数结果,用于测试或某些特定的用例,比如创建一个随机排序的效果script_score:自定义算分函数算法,允许你在查询时动态地编写脚本来计算每个文档的分数
boost_mode运算模式:决定了如何将评分函数的结果与基础查询得分相结合,包括:
multiply:评分函数的结果与基础查询的得分相乘。这是默认行为,适用于希望评分函数增强或减弱基础查询得分的情况。replace:评分函数的结果将完全替换基础查询的得分。这意味着最终得分将完全基于评分函数的结果,而不考虑基础查询的原始得分。
sum
avg
算分函数的其它选项,比如:field_value_factor、script_score大家使用AI自学。
示例2:将下边的查询改为算分函数查询,品牌为“爱氏晨曦”排在前边
GET /items/_search
{
   "from" : 0,
   "query" : {
      "multi_match" : {
         "fields" : [ "name", "category" ],
         "query" : "脱脂牛奶"
      }
   },
   "size" : 5
}
1.1.2 Java Client
使用Java Client实现算分函数查询
@Test
void testFunctionScoreQuery() throws Exception {
    //构建请求
    SearchRequest.Builder builder = new SearchRequest.Builder();
    //设置索引
    builder.index("items");
    //设置查询条件
    SearchRequest.Builder searchRequestBuilder = builder.query(q -> q
       .functionScore(f -> f
                      .query(q1 -> q1.match(m -> m.field("name").query("手机")))
                      .functions(fn -> fn.filter(f1 -> f1
                                         .term(t -> t.field("brand").value("小米")))
                                 .weight(10d)
                                )
                      .boostMode(FunctionBoostMode.Multiply))

      ).from(0).size(10);
    SearchRequest build = searchRequestBuilder.build();
    //执行请求
    SearchResponse<ItemDoc> searchResponse = esClient.search(build, ItemDoc.class);
    //解析结果
    handleResponse(searchResponse);
}
1.2. 深度分页
1.2.1 深度分页问题
前边我们学习分页查询是通过修改
from
size
limit ?, ?
elasticsearch的数据一般会采用分片存储,也就是把一个索引中的数据分成N份,存储到不同节点上。这种存储方式比较有利于数据扩展,但给分页带来了一些麻烦。
比如一个索引库中有100000条数据,分别存储到4个分片,每个分片25000条数据。现在每页查询10条,查询第100页。那么分页查询的条件如下:
GET /items/_search
{
  "from": 990, // 从第990条开始查询
  "size": 10, // 每页查询10条
  "sort": [
    {
      "price": "asc"
    }
  ]
}
从语句来分析,要查询第990~1000名的数据。
从实现思路来分析,是将所有数据排序,找出前1000名,截取其中的990~1000的部分。但问题来了,我们如何才能找到所有数据中的前1000名呢?
要知道每一片的数据都不一样,第1片上的第900~1000,在另1个节点上并不一定依然是900~1000名。所以我们只能在每一个分片上都找出排名前1000的数据,然后汇总到一起,重新排序,才能找出整个索引库中真正的前1000名,此时截取990~1000的数据即可。如图:
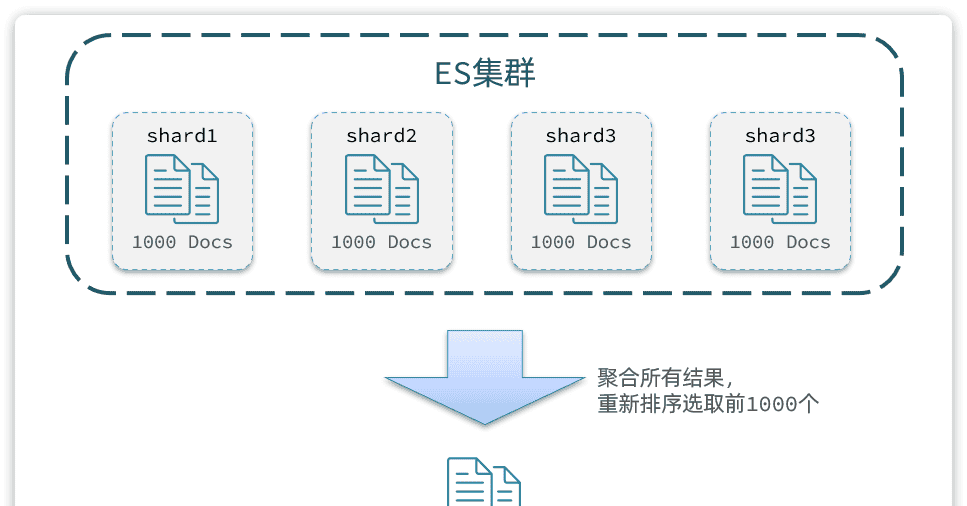
试想一下,假如我们现在要查询的是第1000页数据呢,是不是要找第9990~10000的数据,那岂不是需要把每个分片中的前10000名数据都查询出来,汇总在一起,在内存中排序?如果查询的分页深度更深呢,需要一次检索的数据岂不是更多?
由此可知,当查询分页深度较大时,汇总数据过多,对内存和CPU会产生非常大的压力,特别是在
from
因此elasticsearch会限制
from+ size
size
size
from
from
这意味着,理论上,您可以查询的最大页数是
10,000 / size
size
1.1.2
search after
search after
针对深度分页,elasticsearch提供了两种解决方案:
search after
scroll
详情见文档:https://www.elastic.co/guide/en/elasticsearch/reference/7.17/paginate-search-results.html
search after举例:查询第一页:
查询第二页:
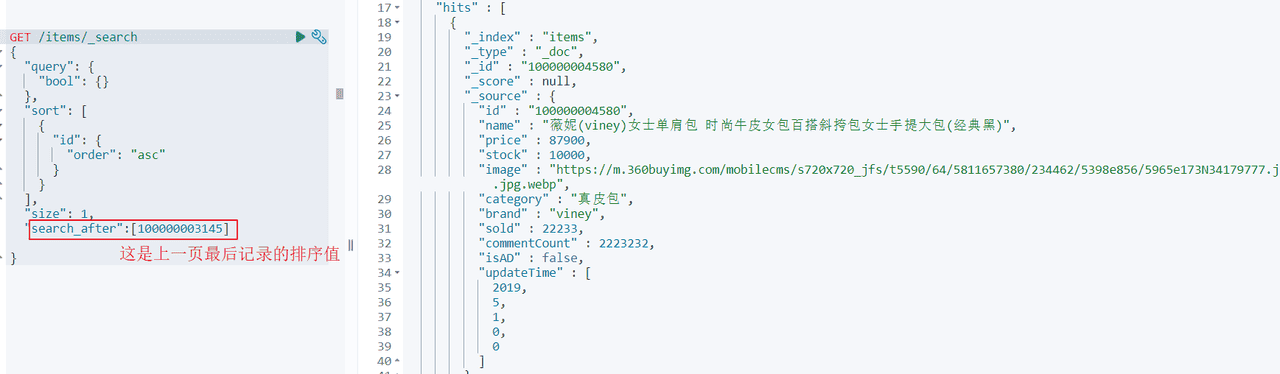
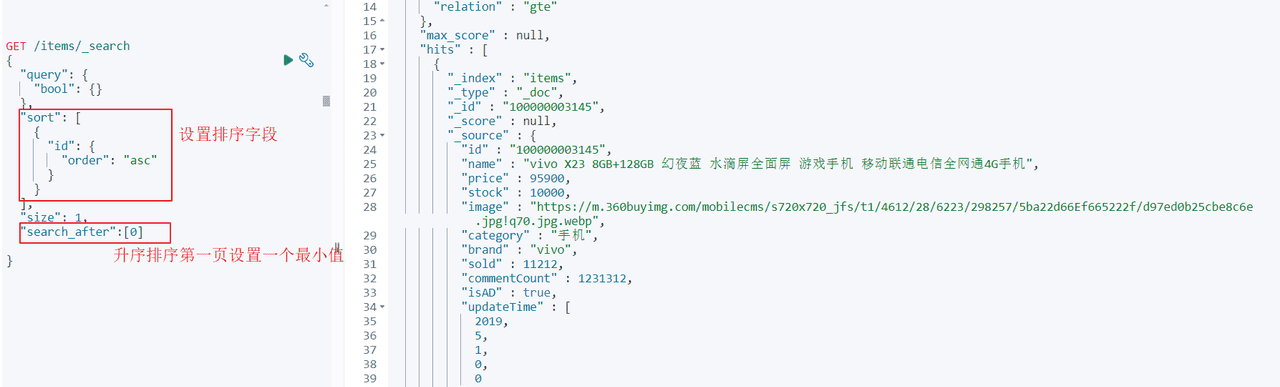
如何使用search_after实现降序排序呢,排序字段是ID?
第一页的search_after值就需要设置一个最大值
GET /items/_search
{
  "query": {
    "bool": {}
  },
  "sort": [
    {
      "id": {
        "order": "desc"
      }
    }
  ],
  "size": 10,
  "search_after":[999999999999]
}
下边使用Java client实现深度分页,请大家自行测试。
@Test
void testSearchAfter() throws IOException {
    // 1.创建Request
    SearchRequest.Builder builder = new SearchRequest.Builder();
    builder.index("items");

    builder.query(q -> q
                  .bool(b -> b))
    .sort(s1 -> s1
          .field(f -> f.field("id").order(SortOrder.Asc)))
    .searchAfter("0")
    .size(1);
    SearchRequest request = builder.build();
    SearchResponse<ItemDoc> response = esClient.search(request, ItemDoc.class);
    // 解析响应
    handleResponse(response);

}
总结:
大多数情况下,我们采用普通分页就可以了。查看百度、京东等网站,会发现其分页都有限制。例如百度最多支持77页,每页不足20条。京东最多100页,每页最多60条。
因此,一般我们采用限制分页深度的方式即可。
1.3.地理坐标查询
1.3.1 介绍
所谓的地理坐标查询,其实就是根据经纬度查询,官方文档
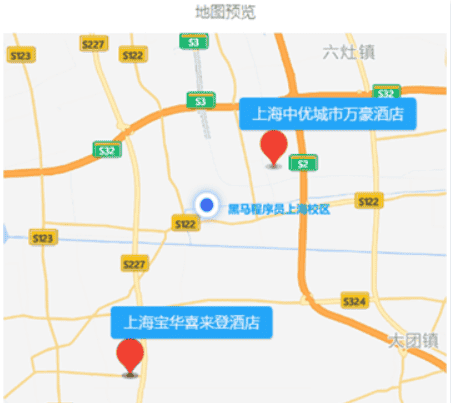
常见的使用场景包括:
携程:搜索我附近的酒店滴滴:搜索我附近的出租车微信:搜索我附近的人
找附近的酒店:
打车:

1.3.2. 矩形范围查询
1.3.2.1 语法
矩形范围查询,也就是geo_bounding_box查询,查询坐标落在某个矩形范围的所有文档:
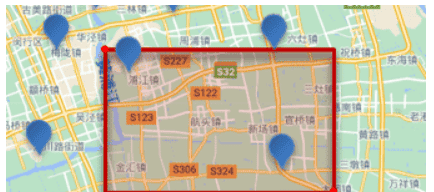
查询时,需要指定矩形的左上、右下两个点的坐标,然后画出一个矩形,落在该矩形内的都是符合条件的点。
语法如下:
// geo_bounding_box查询
GET /indexName/_search
{
  "query": {
    "geo_bounding_box": {
      "FIELD": {
        "top_left": { // 左上点
          "lat": 31.1,
          "lon": 121.5
        },
        "bottom_right": { // 右下点
          "lat": 30.9,
          "lon": 121.7
        }
      }
    }
  }
}
1.3.2.2 向索引添加坐标值
下边进行测试:
首先向索引添加坐标值
添加映射:
PUT /items/_mapping
{
  "properties": {
    "location": {
      "type": "geo_point"
    }
  }
}
设置坐标值:
首先找到坐标值,我们使用高德地图取坐标点。访问:https://lbs.amap.com/tools/picker
输入关键,查找坐标
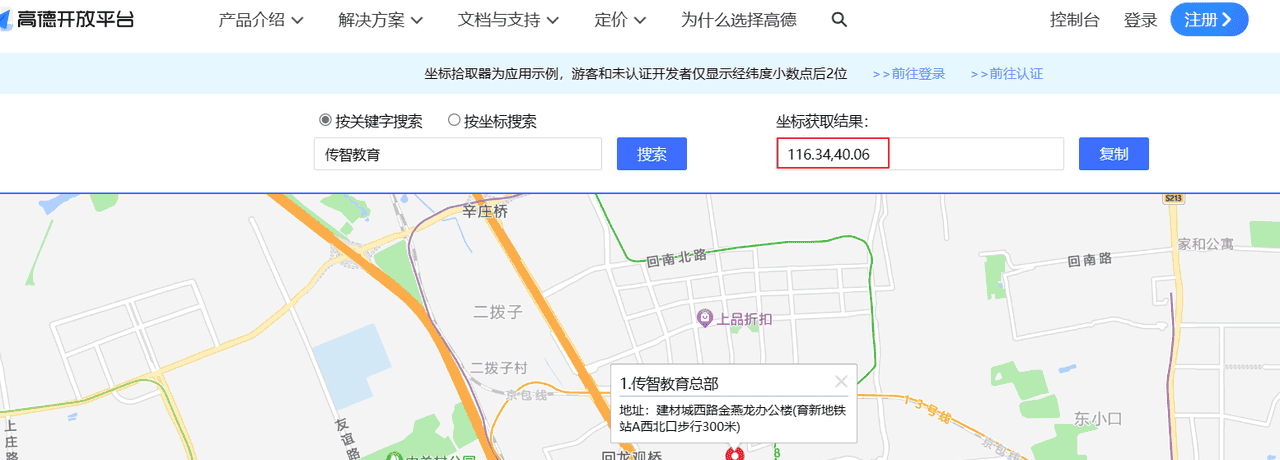
纬度:40.06,经度:116.34
纬度的有效范围是从
-90
+90
-180
+180
执行更新语句,更新坐标值:
POST /items/_update/584391
{
"doc": {
"location": {
"lat": 40.06, // 纬度
"lon": 116.34 // 经度
}
}
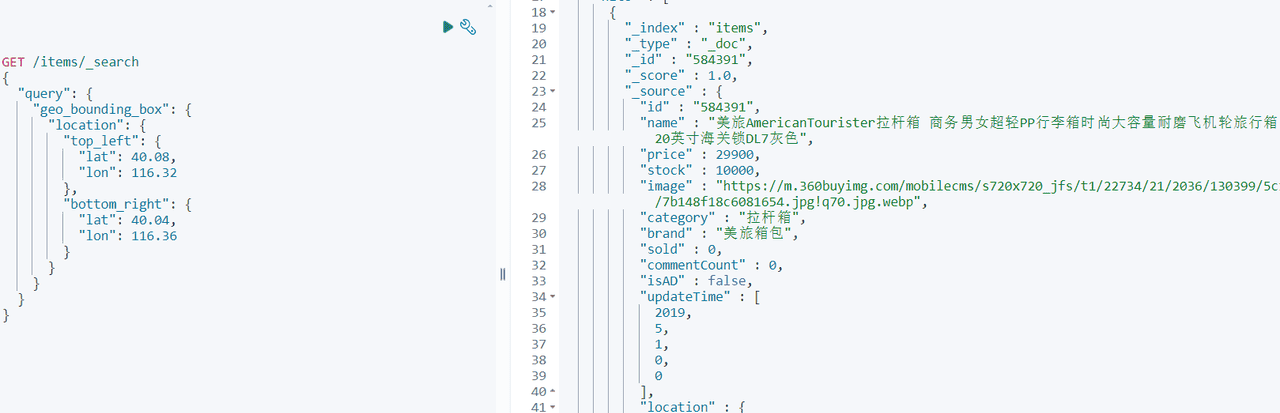
}1.3.2.3 地理坐标搜索测试
地理坐标搜索
找到左上和右下的坐标。
GET /items/_search
{
  "query": {
    "geo_bounding_box": {
      "location": {
        "top_left": {
          "lat": 40.08,
          "lon": 116.32
        },
        "bottom_right": {
          "lat": 40.04,
          "lon": 116.36
        }
      }
    }
  }
}
结果:
1.3.3 附近搜索
1.3.3.1 介绍
附近查询,也叫做距离查询(geo_distance):查询到指定中心点小于某个距离值的所有文档。
换句话来说,在地图上找一个点作为圆心,以指定距离为半径,画一个圆,落在圆内的坐标都算符合条件:

1.3.3.2 语法
语法说明:
// geo_distance 查询
GET /indexName/_search
{
  "query": {
    "geo_distance": {
      "distance": "15km", // 半径
      "FIELD": "31.21,121.5" // 圆心
    }
  }
}
1.3.3.3 测试
执行下边语句进行测试:
GET /items/_search
{
  "query": {
    "geo_distance": {
      "distance": "15km",
      "location": "40.061034,116.345999"
    }
  }
}
1.3.4. Java Client
GeoPoint 类型是Spring data elasticsearch中的一个类,需要将它的依赖添加到pom.xml中
<!--加入spring data elasticsearch-->
<dependency>
  <groupId>org.springframework.data</groupId>
  <artifactId>spring-data-elasticsearch</artifactId>
</dependency>
在ItemDoc类中添加地理坐标字段
@ApiModelProperty("地理坐标")
private GeoPoint location;
对照下边的dsl语句结合AI编写Java Client程序:
dsl:
GET /items/_search
{
  "query": {
    "geo_bounding_box": {
      "location": {
        "top_left": {
          "lat": 40.08,
          "lon": 116.32
        },
        "bottom_right": {
          "lat": 40.04,
          "lon": 116.36
        }
      }
    }
  }
}
Java 程序:
@Test
void testGeo() throws Exception {
    //构建请求
    SearchRequest.Builder builder = new SearchRequest.Builder();
    builder.index("items");
    builder.query(q -> q.geoBoundingBox(g -> g
            .field("location")
            .boundingBox(b -> b
                    .tlbr(tlbr->tlbr
                            .topLeft(t -> t.latlon(l -> l.lat(40.08).lon(116.32)))
                            .bottomRight(b1 -> b1.latlon(l -> l.lat(40.04).lon(116.36)))
    ))));
    SearchRequest build = builder.build();
    //执行请求
    SearchResponse<ItemDoc> searchResponse = esClient.search(build, ItemDoc.class);
    //解析结果
    handleResponse(searchResponse);
}
2 nested类型(了解)
2.1 介绍
Elasticsearch 中的
nested
nested
2.2 添加nested文档
下边向商品映射中添加nested类型的字段attr_list
attr_list表示商品属性,attr_list有两个字段:name、value
PUT /items/_mapping
{
  "properties":{
    "attr_list":{
      "type":"nested",
      "properties":{
        "name":{
          "type":"keyword"
        },
        "value":{
          "type":"keyword"
        }
      }
    }
  }
}
商品索引完整的映射如下,先删除原来的索引现创建新索引。
PUT /items
{
  "mappings" : {
    "properties" : {
      "brand" : {
        "type" : "keyword"
      },
      "category" : {
        "type" : "keyword"
      },
      "commentCount" : {
        "type" : "integer",
        "index" : false
      },
      "id" : {
        "type" : "keyword"
      },
      "image" : {
        "type" : "keyword",
        "index" : false
      },
      "isAD" : {
        "type" : "boolean"
      },
      "name" : {
        "type" : "text",
        "analyzer" : "ik_max_word",
        "search_analyzer" : "ik_smart"
      },
      "price" : {
        "type" : "integer"
      },
      "sold" : {
        "type" : "integer"
      },
      "stock" : {
        "type" : "integer"
      },
      "updateTime" : {
        "type" : "date"
      },
      "location" : {
        "type" : "geo_point"
      },
      "attr_list":{
        "type":"nested",
        "properties":{
          "name":{
            "type":"keyword"
          },
          "value":{
            "type":"keyword"
          }
        }
      }
    }
  }
}
在ItemDoc中添加商品属性字段
package com.hmall.item.domain.po;

import io.swagger.annotations.ApiModel;
import io.swagger.annotations.ApiModelProperty;
import lombok.Data;

import java.time.LocalDateTime;
import java.util.List;

@Data
@ApiModel(description = "索引实体")
public class ItemDoc {

    @ApiModelProperty("商品id")
    private String id;

    @ApiModelProperty("商品名称")
    private String name;

    @ApiModelProperty("价格(分)")
    private Integer price;

    @ApiModelProperty("库存")
    private Integer stock;

    @ApiModelProperty("商品图片")
    private String image;

    @ApiModelProperty("类目名称")
    private String category;

    @ApiModelProperty("品牌名称")
    private String brand;

    @ApiModelProperty("销量")
    private Integer sold;

    @ApiModelProperty("评论数")
    private Integer commentCount;

    @ApiModelProperty("是否是推广广告,true/false")
    private Boolean isAD;

    @ApiModelProperty("更新时间")
    private LocalDateTime updateTime;
    //位置
    @ApiModelProperty("商品位置")
    private GeoPoint location;
    //商品属性
    @ApiModelProperty("商品规格")
    private List<Spec> attr_list;

    @Data
    public static class Spec {
        private String name;
        private String value;
    }
}
向索引添加文档,可以添加单个文档也可以批量添加文档,添加文档时指定商品属性。
@Test
void testAddDocument2() throws Exception {
    //商品id
    Long id = 317578L;
    //根据id查询商品
    Item item = itemService.getById(id);
    //转为ItemDoc
    ItemDoc itemDoc = BeanUtils.copyBean(item, ItemDoc.class);
    ItemDoc.Spec spec_1 = new ItemDoc.Spec();
    spec_1.setName("大小");
    spec_1.setValue("60*40");
    //再设置一个新规格
    ItemDoc.Spec spec_2 = new ItemDoc.Spec();
    spec_2.setName("颜色");
    spec_2.setValue("白色");
    itemDoc.setAttr_list(List.of(spec_1, spec_2));
    //使用esClient添加文档
    IndexResponse response = esClient.index(i -> i
                                            .index("items")
                                            .id(id.toString())
                                            .document(itemDoc));

    // 打印结果
    String s = response.result().jsonValue();
    log.info("添加文档结果:{}", s);
}
查询文档:GET /items/_doc/317578
{
  "_index" : "items",
  "_type" : "_doc",
  "_id" : "317578",
  "_version" : 1,
  "_seq_no" : 0,
  "_primary_term" : 1,
  "found" : true,
  "_source" : {
    "id" : "317578",
    "name" : "RIMOWA 21寸托运箱拉杆箱 SALSA AIR系列果绿色 820.70.36.4",
    "price" : 28900,
    "stock" : 9985,
    "image" : "https://m.360buyimg.com/mobilecms/s720x720_jfs/t6934/364/1195375010/84676/e9f2c55f/597ece38N0ddcbc77.jpg!q70.jpg.webp",
    "category" : "拉杆箱",
    "brand" : "RIMOWA",
    "sold" : 0,
    "commentCount" : 0,
    "isAD" : false,
    "updateTime" : [
      2024,
      10,
      25,
      17,
      52,
      8
    ],
    "attr_list" : [
      {
        "name" : "大小",
        "value" : "60*40"
      },
      {
        "name" : "颜色",
        "value" : "白色"
      }
    ]
  }
}
2.3 搜索nested
查询商品颜色是白色的商品。
GET /items/_search
{
  "query": {
    "nested": {
      "path": "attr_list",
      "query": {
        "bool": {
          "must": [
            {
              "term": {
                "attr_list.name": {
                  "value": "颜色"
                }
              }
            },
            {
              "term": {
                "attr_list.value": {
                  "value": "白色"
                }
              }
            }
          ]
        }
      }
    }
  }
}
“nested”:这是一个嵌套查询,用于查询嵌套对象。它允许你在嵌套对象中执行更复杂的查询。
“path”: “attr_list”:指定了要查询哪个嵌套对象字段。在这个例子中,嵌套对象的字段名是attr_list
2.4 聚合nested
先按商品属性名称聚合,再按属性值聚合。
GET /items/_search
{
  "size": 0,
  "aggs": {
    "attr_aggs": {
      "nested": {
        "path": "attr_list"
      },
      "aggs": {
        "attr_name_aggs": {
          "terms": {
            "field": "attr_list.name",
            "size": 10
          },
          "aggs": {
            "attr_value_aggs": {
              "terms": {
                "field": "attr_list.value",
                "size": 10
              }
            }
          }
        }
      }
    }
  }
}
结果:
{
  "took" : 3,
  "timed_out" : false,
  "_shards" : {
    "total" : 1,
    "successful" : 1,
    "skipped" : 0,
    "failed" : 0
  },
  "hits" : {
    "total" : {
      "value" : 200,
      "relation" : "eq"
    },
    "max_score" : null,
    "hits" : [ ]
  },
  "aggregations" : {
    "attr_aggs" : {
      "doc_count" : 400,
      "attr_name_aggs" : {
        "doc_count_error_upper_bound" : 0,
        "sum_other_doc_count" : 0,
        "buckets" : [
          {
            "key" : "大小",
            "doc_count" : 200,
            "attr_value_aggs" : {
              "doc_count_error_upper_bound" : 0,
              "sum_other_doc_count" : 0,
              "buckets" : [
                {
                  "key" : "120*80",
                  "doc_count" : 100
                },
                {
                  "key" : "60*40",
                  "doc_count" : 100
                }
              ]
            }
          },
          {
            "key" : "颜色",
            "doc_count" : 200,
            "attr_value_aggs" : {
              "doc_count_error_upper_bound" : 0,
              "sum_other_doc_count" : 0,
              "buckets" : [
                {
                  "key" : "白色",
                  "doc_count" : 100
                },
                {
                  "key" : "黑色",
                  "doc_count" : 100
                }
              ]
            }
          }
        ]
      }
    }
  }
}
2.5 Java Client
2.5.1 nested查询
根据下边的DSL编写java代码:
DSL:
GET /items/_search
{
    "query": {
        "nested": {
            "path": "attr_list",
            "query": {
                "bool": {
                    "must": [
                    {
                        "term": {
                            "attr_list.name": {
                                "value": "颜色"
                            }
                        }
                    },
                    {
                        "term": {
                            "attr_list.value": {
                                "value": "白色"
                            }
                        }
                    }
                    ]
                }
            }
        }
    }
}
Java Client:
@Test
void testNested() throws Exception {
    SearchRequest.Builder builder = new SearchRequest.Builder();
    builder.index("items");

    builder.query(q -> q.nested(n -> n
            .path("attr_list")
            .query(q1 -> q1
                    .bool(b -> b
                            .must(a -> a
                                    .term(t -> t.field("attr_list.name").value("颜色")))
                            .must(a1 -> a1
                                    .term(t -> t.field("attr_list.value").value("白色")))))));
    SearchRequest build = builder.build();
    SearchResponse<ItemDoc> response = esClient.search(build, ItemDoc.class);
    //解析结果
    List<Hit<ItemDoc>> hits = response.hits().hits();
    hits.forEach(hit -> {
        ItemDoc source = hit.source();
        log.info("查询结果:{}", source);
    });
}
2.5.2 nested聚合
下边是对nested进行聚合:
DSL:
GET /items/_search
{
  "size": 0,
  "aggs": {
    "attr_aggs": {
      "nested": {
        "path": "attr_list"
      },
      "aggs": {
        "attr_name_aggs": {
          "terms": {
            "field": "attr_list.name",
            "size": 10
          },
          "aggs": {
            "attr_value_aggs": {
              "terms": {
                "field": "attr_list.value",
                "size": 10
              }
            }
          }
        }
      }
    }
  }
}
Java Client:
@Test
void testNestedAggs() throws Exception {

    SearchRequest.Builder builder = new SearchRequest.Builder();
    builder.index("items2");
    builder.size(0);
    builder.aggregations("attr_aggs", a -> a
            .nested(n -> n.path("attr_list"))
            .aggregations("attr_name_aggs", a1 -> a1
                    .terms(t -> t
                            .field("attr_list.name")
                            .size(10))
                    .aggregations("attr_value_aggs", a2 -> a2
                            .terms(t -> t
                                    .field("attr_list.value")
                            )
                    )
            )
    );
    SearchRequest build = builder.build();

    SearchResponse<ItemDoc> response = esClient.search(build, ItemDoc.class);

    Map<String, Aggregate> aggregations = response.aggregations();
    Aggregate attrAggs = aggregations.get("attr_aggs");

    //解析结果
    NestedAggregate nested = attrAggs.nested();
    Map<String, Aggregate> attrNameAggs = nested.aggregations();
    Aggregate aggregate = attrNameAggs.get("attr_name_aggs");
    aggregate.sterms().buckets().array().forEach(bucket -> {

        String key = bucket.key().stringValue();
        Long docCount = bucket.docCount();
        log.info("属性名:{},属性值数量:{}", key, docCount);

        Map<String, Aggregate> aggregations1 = bucket.aggregations();
        Aggregate attrValueAggs = aggregations1.get("attr_value_aggs");

        attrValueAggs.sterms().buckets().array()
        .forEach(bucket1 -> {
            String key1 = bucket1.key().stringValue();
            Long docCount1 = bucket1.docCount();
            log.info("属性值:{},属性值数量:{}", key1, docCount1);
        });
    });


}
3. 同义词(了解)
3.1 设置同义词
搜索中同义词的需求:在搜索时输入一个关键字,包含关键字同义词的文档应该也可以搜索出来。
比如:输入“电脑”,会搜索出包含“计算机”的文档,输入“黑马”搜索出“黑马程序员”、“传智播客”的文章。
elasticsearch 的同义词有如下两种形式:
单向同义词:
heima,黑马 => 黑马程序员,黑马、传智播客箭头左侧的词都会映射成箭头右侧的词。
输入箭头左侧的词可以搜索出箭头右侧的词。
双向同义词:
马铃薯, 土豆, potato双向同义词可以互相映射。
输入“土豆”可以搜索出“potato”,输入“potato”可以搜索出“土豆”
怎么设置同义词?
首先在同义词加到
synonyms.txt

我们在synonyms.txt中加入:
中国,中华人民共和国,china
heima,黑马=>黑马程序员,黑马、传智播客
3.2 定义同义词分词器
在设置索引映射时自定义同义词分词器my_synonyms_analyzer,并且用于“title”字段的搜索。举例:
PUT /test_index
{
  "settings": {
    "analysis": {
      "filter": {
        "my_synonym_filter": {
          "type": "synonym",
          "updateable": true,
          "synonyms_path": "synonyms.txt"
        }
      },
      "analyzer": {
        "my_synonyms_analyzer": {
          "tokenizer": "ik_smart",
          "filter": [
            "my_synonym_filter"
          ]
        }
      }
    }
  },
  "mappings": {
    "properties": {
      "title": {
        "type": "text",
        "analyzer": "ik_max_word",
        "search_analyzer": "my_synonyms_analyzer"
      }
    }
  }
}
my_synonym_filter
词汇过滤器
my_synonyms_analyzer
my_synonyms_analyzer
my_synonym_filter
updateable
true
synonyms_path
my_synonyms_analyzer
ik_smart
ik_smart
mappings.properties.title.search_analyzer
title
my_synonyms_analyzer
3.3 测试
首先向test_index索引中添加数据
POST /_bulk
{"index": {"_index":"test_index", "_id": "5"}}
{"title": "china你好"}
{"index": {"_index":"test_index", "_id": "4"}}
{"title": "中国你好"}
{"index": {"_index":"test_index", "_id": "6"}}
{"title": "中华人民共和国你好"}
{"index": {"_index":"test_index", "_id": "7"}}
{"title": "China你好"}
{"index": {"_index":"test_index", "_id": "8"}}
{"title": "这是一匹黑马"}
{"index": {"_index":"test_index", "_id": "9"}}
{"title": "黑马是中国良心培训机构"}
{"index": {"_index":"test_index", "_id": "10"}}
{"title": "黑马程序员是中国良心培训机构"}
{"index": {"_index":"test_index", "_id": "11"}}
{"title": "传智播客一所IT培训机构"}
搜索关键字“china”
GET /test_index/_search
{
  "query": {
    "match": {
      "title": "china"
    }
  }
}
结果中包括:中国,中华人民共和国,china词。
输入“黑马”会搜索出包括:黑马程序员,黑马、传智播客 词的文章 。
输入“传智播客”只能搜索出包含“传智播客”的文章 。
如果要实现输入“传智播客”搜索出“黑马程序员”的文章 怎么实现?
在同义词文件中加入:传智播客,黑马程序员
执行:POST /test_index/_reload_search_analyzers 使用同义词生效。
再次测试:
GET /test_index/_search
{
  "query": {
    "match": {
      "title": "传智播客"
    }
  }
}
输出结果:
{
  "took" : 0,
  "timed_out" : false,
  "_shards" : {
    "total" : 1,
    "successful" : 1,
    "skipped" : 0,
    "failed" : 0
  },
  "hits" : {
    "total" : {
      "value" : 2,
      "relation" : "eq"
    },
    "max_score" : 1.6655793,
    "hits" : [
      {
        "_index" : "test_index",
        "_type" : "_doc",
        "_id" : "11",
        "_score" : 1.6655793,
        "_source" : {
          "title" : "传智播客一所IT培训机构"
        }
      },
      {
        "_index" : "test_index",
        "_type" : "_doc",
        "_id" : "10",
        "_score" : 1.3592656,
        "_source" : {
          "title" : "黑马程序员是中国良心培训机构"
        }
      }
    ]
  }
}
3.4 思考
如果要实现搜索itheima将黑马程序员相关的记录搜索出来怎么做?
自己在同义词配置文件配置同义词进行测试。
搜索“手机壳”不要搜索出手机的记录?
4 自动补全(掌握)
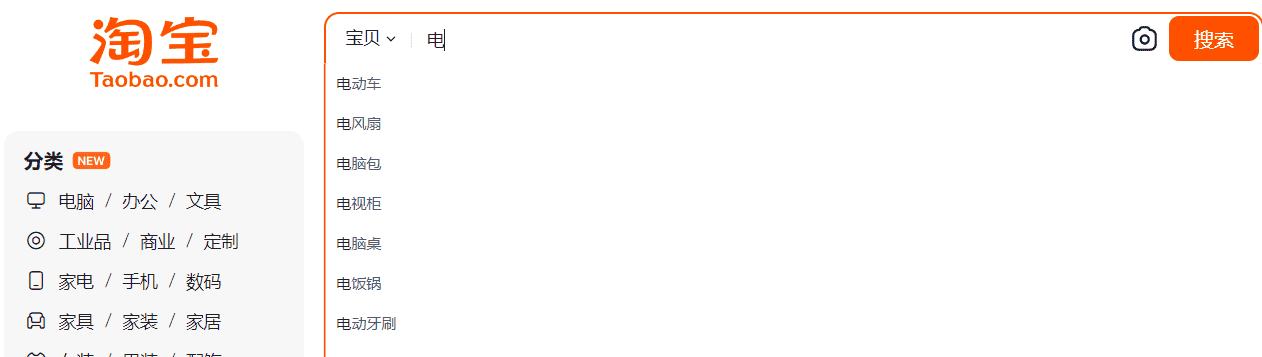
4.1 介绍
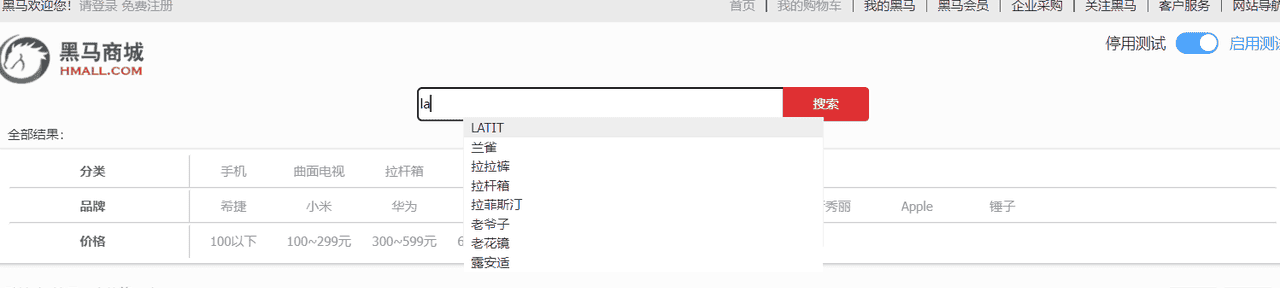
当用户在搜索框输入字符时提示出与该字符有关的搜索项,这个效果就是自动补全,如下图输入拼音可以补全拼音对应的中文:

输入中文也可以自动补全:
Elasticsearch如何实现自动补全?
要实现上述自动补全的需求需要完成两个功能:
拼音搜索前缀搜索
4.2. 拼音分词器
4.2.1 安装拼音分词器
4.2.1.1 安装
自动补全如何实现根据拼音字母来补全?
效果如下图:

输入拼音”dian”提示“电动车”、“电风扇”等,根据搜索的原理,输入的关键字去匹配索引中的词,所以索引中必须有“dian”这个词条,而”dian”拼音来源于中文汉字,所以首先要解决的是中文在分词后将每个词条生成拼音,也就是在索引的词条中既有中文汉字又有拼音,这样就可以实现输入拼音可以搜索出匹配的词条。
实现拼音搜索就要用到拼音分词器。
与IK分词器一样,拼音分词器也有插件,在GitHub上有elasticsearch的拼音分词插件。
地址:https://github.com/medcl/elasticsearch-analysis-pinyin
找到与Elasticsearch版本一致的插件下载包。
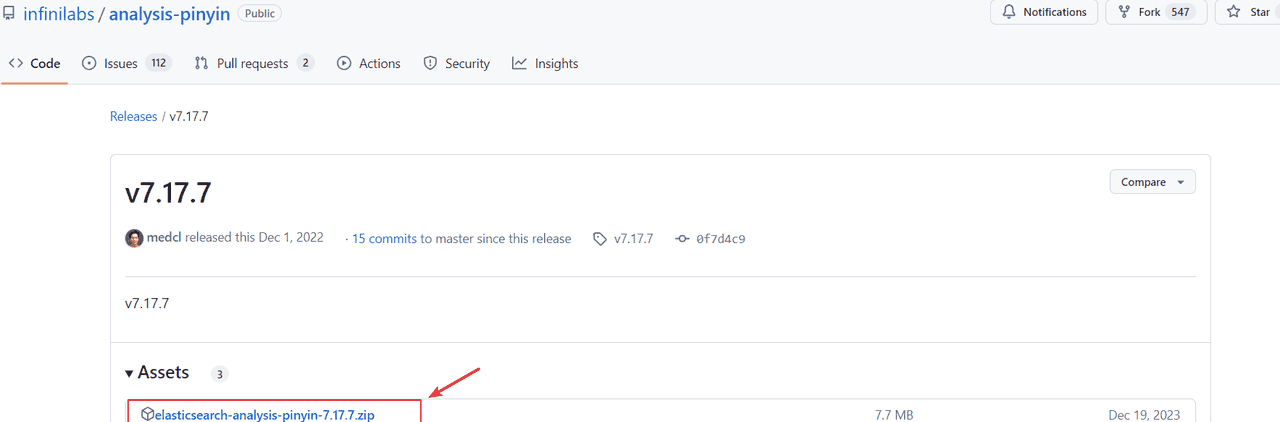
可自行下载也可从课程资料目录获取
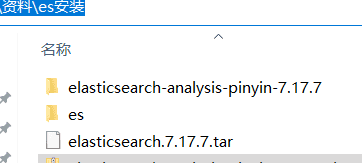
安装方式与IK分词器一样,分三步:
①解压elasticsearch-analysis-pinyin-7.17.7.zip
②上传到虚拟机中elasticsearch的plugin目录
③重启elasticsearch
④测试
4.2.1.2 测试
测试用法如下:
POST /_analyze
{
  "text": "黑马程序员",
  "analyzer": "pinyin"
}
结果如下:
token:即分词结果,全部为拼音
{
  "tokens" : [
    {
      "token" : "hei",
      "start_offset" : 0,
      "end_offset" : 0,
      "type" : "word",
      "position" : 0
    },
    {
      "token" : "hmcxy",
      "start_offset" : 0,
      "end_offset" : 0,
      "type" : "word",
      "position" : 0
    },
    {
      "token" : "ma",
      "start_offset" : 0,
      "end_offset" : 0,
      "type" : "word",
      "position" : 1
    },
    {
      "token" : "cheng",
      "start_offset" : 0,
      "end_offset" : 0,
      "type" : "word",
      "position" : 2
    },
    {
      "token" : "xu",
      "start_offset" : 0,
      "end_offset" : 0,
      "type" : "word",
      "position" : 3
    },
    {
      "token" : "yuan",
      "start_offset" : 0,
      "end_offset" : 0,
      "type" : "word",
      "position" : 4
    }
  ]
}
4.2.2 自定义分词器
4.2.2.1 定义分词器
默认的拼音分词器会将每个汉字单独分为拼音,而我们希望的是每个词条形成一组拼音,需要对拼音分词器做个性化定制,形成自定义分词器。
elasticsearch中分词器(analyzer)的组成包含三部分:
character filters:在tokenizer之前对文本进行处理。例如删除字符、替换字符tokenizer:将文本按照一定的规则切割成词条(term)。例如keyword,就是不分词;还有ik_smarttokenizer filter:将tokenizer输出的词条做进一步处理。例如大小写转换、同义词处理、拼音处理等
文档分词时会依次由这三部分来处理文档:

声明自定义分词器的语法如下:
在test_index2索引中自定义my_analyzer分词器,my_analyzer的功能是ik_max_word加拼音分词器。
PUT /test_index2
{
  "settings": {
    "analysis": {
      "analyzer": { // 自定义分词器
        "my_analyzer": {  // 分词器名称
          "tokenizer": "ik_max_word",
          "filter": "py"
        }
      },
      "filter": { // 自定义tokenizer filter
        "py": { // 过滤器名称
          "type": "pinyin", // 过滤器类型,这里是pinyin
          "keep_full_pinyin": true,
          "keep_joined_full_pinyin": true,
          "keep_original": true,
          "limit_first_letter_length": 16,
          "remove_duplicated_term": true,
          "none_chinese_pinyin_tokenize": false
        }
      }
    }
  },
  "mappings": {
    "properties": {
      "name": {
        "type": "text",
        "analyzer": "my_analyzer",
        "search_analyzer": "ik_smart"
      }
    }
  }
}
说明:
type
这指定了过滤器的类型为
pinyin
keep_full_pinyin
控制是否保留完整的拼音形式。设置为
false
keep_joined_full_pinyin
控制是否保留连接的完整拼音形式。设置为
true
keep_original
控制是否保留原文本。设置为
true
limit_first_letter_length
控制首字母的最大长度。例如,“你好” 的首字母形式为 “n h”,这个值控制了首字母的最大长度。
remove_duplicated_term
控制是否移除重复的词条。设置为
true
none_chinese_pinyin_tokenize
控制是否对非中文文本也进行拼音分词。设置为
false
4.2.2.2 测试
下边测试my_analyzer的分词效果:
POST /test_index2/_analyze
{
  "text": "黑马程序员",
  "analyzer": "my_analyzer"
}
结果如下:
“黑马程序员”分词结果包括中文分词和拼音。
{
  "tokens" : [
    {
      "token" : "黑马程序员",
      "start_offset" : 0,
      "end_offset" : 5,
      "type" : "CN_WORD",
      "position" : 0
    },
    {
      "token" : "heimachengxuyuan",
      "start_offset" : 0,
      "end_offset" : 5,
      "type" : "CN_WORD",
      "position" : 0
    },
    {
      "token" : "hmcxy",
      "start_offset" : 0,
      "end_offset" : 5,
      "type" : "CN_WORD",
      "position" : 0
    },
    {
      "token" : "黑马",
      "start_offset" : 0,
      "end_offset" : 2,
      "type" : "CN_WORD",
      "position" : 1
    },
    {
      "token" : "heima",
      "start_offset" : 0,
      "end_offset" : 2,
      "type" : "CN_WORD",
      "position" : 1
    },
    {
      "token" : "hm",
      "start_offset" : 0,
      "end_offset" : 2,
      "type" : "CN_WORD",
      "position" : 1
    },
    {
      "token" : "程序员",
      "start_offset" : 2,
      "end_offset" : 5,
      "type" : "CN_WORD",
      "position" : 2
    },
    {
      "token" : "chengxuyuan",
      "start_offset" : 2,
      "end_offset" : 5,
      "type" : "CN_WORD",
      "position" : 2
    },
    {
      "token" : "cxy",
      "start_offset" : 2,
      "end_offset" : 5,
      "type" : "CN_WORD",
      "position" : 2
    },
    {
      "token" : "程序",
      "start_offset" : 2,
      "end_offset" : 4,
      "type" : "CN_WORD",
      "position" : 3
    },
    {
      "token" : "chengxu",
      "start_offset" : 2,
      "end_offset" : 4,
      "type" : "CN_WORD",
      "position" : 3
    },
    {
      "token" : "cx",
      "start_offset" : 2,
      "end_offset" : 4,
      "type" : "CN_WORD",
      "position" : 3
    },
    {
      "token" : "员",
      "start_offset" : 4,
      "end_offset" : 5,
      "type" : "CN_CHAR",
      "position" : 4
    },
    {
      "token" : "yuan",
      "start_offset" : 4,
      "end_offset" : 5,
      "type" : "CN_CHAR",
      "position" : 4
    },
    {
      "token" : "y",
      "start_offset" : 4,
      "end_offset" : 5,
      "type" : "CN_CHAR",
      "position" : 4
    }
  ]
}
下边向test_index2索引中添加一些文档进行测试。
POST test_index2/_doc/100
{
  "id":100,
  "name":"RIMOWA 30寸托运箱拉杆箱 SALSA AIR系列果绿色 820.70.36.4"
}


POST test_index2/_doc/101
{
  "id":101,
  "name":"莎米特SUMMIT 旅行拉杆箱28英寸PC材质大容量旅行行李箱PC154 黑色"
}
搜索测试:
搜索拼音:
GET /test_index2/_search
{
  "query": {
    "match": {
      "name": "laganxiang"
    }
  }
}
搜索汉字:
GET /test_index2/_search
{
  "query": {
    "match": {
      "name": "拉杆箱"
    }
  }
}
4.3 自动补全查询
4.3.1.
completion
completion
4.3.1.1 前缀搜索
拼音搜索问题解决了,下边要实现前缀搜索,从自动补全的效果看,当输入一个汉字或拼音此时就要搜索出匹配的词条。
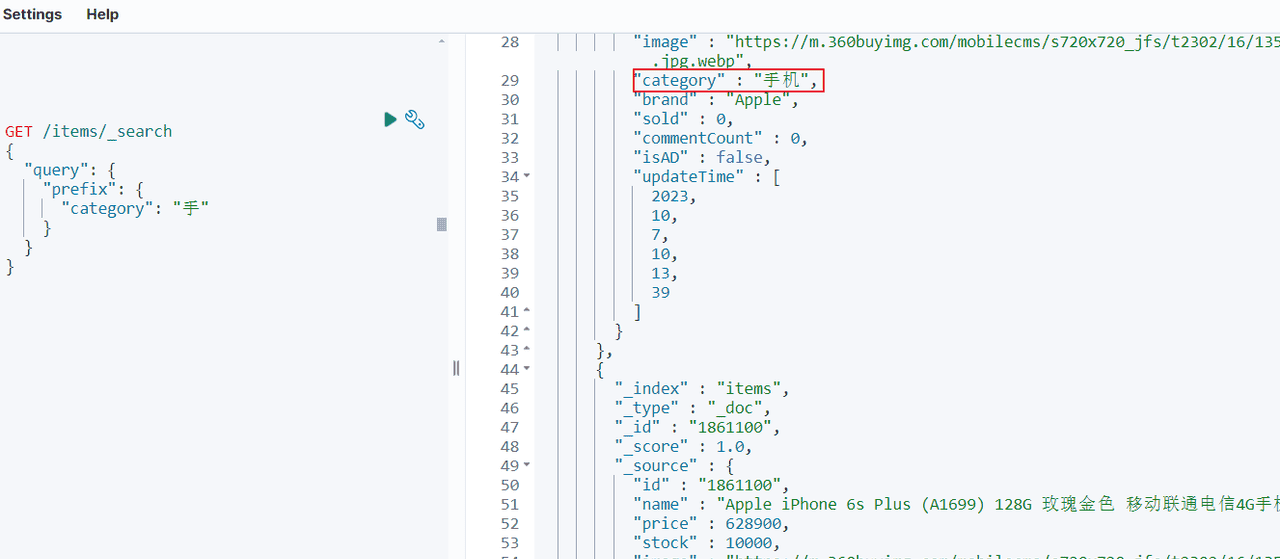
关于前缀搜索有最简单的query.prefix方式,如下:查询items索引中category字段前缀是“手”的文档。
GET /items/_search
{
  "query": {
    "prefix": {
      "category": "手"
    }
  }
}
搜索结果:
对于前缀查询:
性能问题:
当提供的前缀较短时性能慢,因为它需要扫描更多的文档来查找匹配项。为了提高性能,尽量使用更长的前缀进行查询。
不计算相关性得分:
prefix
与 filter 的差异:
prefix
filter
filter
4.3.1.2
completion
completion
Elasticsearch专门设计
completion
completion
completion
completion
参与补全查询的字段必须是completion类型。字段的内容一般是用来补全的多个词条形成的数组。
首先创建映射时指定专门的字段为自动补全使用,并且字段的类型为completion类型。
我们在test_index2索引中添加suggestion字段并且设置为completion类型
PUT /test_index2/_mapping
{
  "properties":{
    "suggestion":{
      "type":"completion"
    }
  }
}
4.3.1.2 测试
然后更新原有文档,文档中指定了自动补全的内容。
POST /test_index2/_update/100
{
  "doc": {
    "suggestion": ["拉杆箱","托运箱"]
  }
}


POST /test_index2/_update/101
{
  "doc": {
    "suggestion": ["拉杆箱","旅行箱","莎米特"]
  }
}
使用下边的语句测试自动补全:
GET /test_index2/_search
{
  "suggest" : {
    "suggestion_suggest" : {
      "completion" : {
        "field" : "suggestion",
        "size" : 10,
        "skip_duplicates" : true
      },
      "text" : "旅"
    }
  }
}
suggest
这是建议器的顶级对象,用于配置建议器。
suggestion_suggest
这是建议器的名称,可以自定义。它用于标识建议器。
completion
这是指定建议器类型的部分。在这里,我们使用的是
completion
field
这是用于建议的字段名称。在这个例子中,我们使用名为
suggestion
completion
size
这个参数控制返回的建议数量。在这个例子中,我们设置了
size
skip_duplicates
这个参数用于控制是否在返回的建议中跳过重复的条目。在这个例子中,我们设置为
true
text
这是用户输入的文本,用于生成建议。在这个例子中,我们输入了字符“黑”。
执行结果:
重点看suggest片段。
{
  "took" : 2,
  "timed_out" : false,
  "_shards" : {
    "total" : 1,
    "successful" : 1,
    "skipped" : 0,
    "failed" : 0
  },
  "hits" : {
    "total" : {
      "value" : 0,
      "relation" : "eq"
    },
    "max_score" : null,
    "hits" : [ ]
  },
  "suggest" : {
    "suggestion_suggest" : [
      {
        "text" : "旅", //输入的前缀
        "offset" : 0,
        "length" : 1,
        "options" : [
          {
            "text" : "旅行箱", //完整的建议文本
            "_index" : "test_index2",
            "_type" : "_doc",
            "_id" : "101",
            "_score" : 1.0, //这个建议的相关性评分,分数越高表示与查询越匹配。
            "_source" : {
              "id" : 101,
              "name" : "莎米特SUMMIT 旅行拉杆箱28英寸PC材质大容量旅行行李箱PC154 黑色",
              "suggestion" : [
                "拉杆箱",
                "旅行箱",
                "莎米特"
              ]
            }
          }
        ]
      }
    ]
  }
}
通过上边的结果可以拿到输入前缀“旅”的建议结果”旅行箱”。
4.3.3. Java Client
首先需要定义模型类,模型类中定义字段 List<String> suggestion;与文档中的自动补全字段对应。
参考DSL语句编写Java Client代码。
@Test
 void testSuggest() throws IOException {
     SearchRequest.Builder builder = new SearchRequest.Builder();
     builder.index("test_index2");
    builder.suggest(s -> s
            .suggesters("suggestion_suggest", ss -> ss
                    .completion(c -> c
                            .field("suggestion")
                            .size(10)
                            .skipDuplicates(true))
                    .text("拉"))
            );
     SearchRequest request = builder.build();
     SearchResponse<Index2> response = esClient.search(request, Index2.class);
     Map<String, List<Suggestion<Index2>>> suggest = response.suggest();
     List<Suggestion<Index2>> suggestion_suggest = suggest.get("suggestion_suggest");
     suggestion_suggest.stream().forEach(suggestion -> {
         suggestion.completion().options().forEach(option -> {
             String text = option.text();
             System.out.println(text);
         });
     });
 }

 /**
  * 测试自动补全模型类
  */
@Data
 public static class Index2 {
     //id
    private Long id;
    //name
    private String name;
     private List<String> suggestion;

 }
4.4. 拼音自动补全
4.4.1 需求分析
学习了自动补全的查询方法后接下来思考如何在电商项目的搜索输入框实现自动补全功能。
效果如下:输入拼音可以补全拼音对应的中文:

输入中文也可以自动补全:

首先在商品索引映射中添加suggestion字段,专门用于自动补全,此字段的内容可以是商品的品牌、分类。
此字段的type为completion。
要实现拼音搜索那么此字段分词器具有拼音分词功能
对suggestion字段不分词但需要搜索,比如:“电动牙刷”只有输入前缀可以搜索到,所以分词器用keyword加拼音分词。
在商品索引对应的模型类中添加suggestion字段,类型为List<String>如果在索引中后来添加的自动补全字段,要想对以前的文档生效自动补全功能则需要添加过suggestion字段后重新更新文档内容。
4.4.2 创建自动补全字段
自定义分词器,
PUT /test_index3
{
  "settings": {
    "analysis": {
      "analyzer": {
        "completion_analyzer": {
          "tokenizer": "keyword",
          "filter": "py"
        }
      },
      "filter": {
        "py": {
          "type": "pinyin",
          "keep_full_pinyin": true,
          "keep_joined_full_pinyin": true,
          "keep_original": true,
          "limit_first_letter_length": 16,
          "remove_duplicated_term": true,
          "none_chinese_pinyin_tokenize": false
        }
      }
    }
  },
  "mappings": {
    "properties": {
      "id": {
        "type": "keyword"
      },
      "name":{
        "type": "text",
        "analyzer": "ik_max_word",
        "search_analyzer": "ik_smart"
      },
      "suggestion":{
        "type": "completion",
        "analyzer": "completion_analyzer"
      }
    }
  }
}
4.4.3 更新/新增文档
POST test_index3/_doc/100
{
  "id":100,
  "name":"RIMOWA 30寸托运箱拉杆箱 SALSA AIR系列果绿色 820.70.36.4",
  "suggestion": ["拉杆箱","托运箱"]
}


POST test_index3/_doc/101
{
  "id":101,
  "name":"莎米特SUMMIT 旅行拉杆箱28英寸PC材质大容量旅行行李箱PC154 黑色",
  "suggestion": ["拉杆箱","旅行箱","莎米特"]
}

POST test_index3/_doc/102
{
  "id":102,
  "name":"拉菲斯汀(La Festin)612026 新款女士钱包 头层牛皮短款钱包 凯利黑",
  "suggestion": ["拉菲斯汀","女包"]
}
4.4.4 测试
测试自动补全:
输入汉字:
GET /test_index3/_search
{
  "suggest" : {
    "suggestion_suggest" : {
      "completion" : {
        "field" : "suggestion",
        "size" : 2,
        "skip_duplicates" : true
      },
      "text" : "la"
    }
  }
}
结果:

5 实战
5.1 自动补全功能
搜索框实现自动补全功能,效果如下图:
提示
在原有items索引结构基础添加自动补全字段suggestion(支持拼音分词)
删除原来的索引:
DELETE /items创建新索引
PUT /items
{
  "settings": {
    "analysis": {
      "analyzer": {
        "completion_analyzer": {
          "tokenizer": "keyword",
          "filter": "py"
        }
      },
      "filter": {
        "py": {
          "type": "pinyin",
          "keep_full_pinyin": true,
          "keep_joined_full_pinyin": true,
          "keep_original": true,
          "limit_first_letter_length": 16,
          "remove_duplicated_term": true,
          "none_chinese_pinyin_tokenize": false
        }
      }
    }
  },
  "mappings" : {
    "properties" : {
      "attr_list" : {
        "type" : "nested",
        "properties" : {
          "name" : {
            "type" : "keyword"
          },
          "value" : {
            "type" : "keyword"
          }
        }
      },
      "brand" : {
        "type" : "keyword"
      },
      "category" : {
        "type" : "keyword"
      },
      "commentCount" : {
        "type" : "integer",
        "index" : false
      },
      "id" : {
        "type" : "keyword"
      },
      "image" : {
        "type" : "keyword",
        "index" : false
      },
      "isAD" : {
        "type" : "boolean"
      },
      "location" : {
        "type" : "geo_point"
      },
      "name" : {
        "type" : "text",
        "analyzer" : "ik_max_word",
        "search_analyzer" : "ik_smart"
      },
      "price" : {
        "type" : "integer"
      },
      "sold" : {
        "type" : "integer"
      },
      "stock" : {
        "type" : "integer"
      },
      "suggestion" : {
        "type" : "completion",
        "analyzer" : "completion_analyzer",
        "preserve_separators" : true,
        "preserve_position_increments" : true,
        "max_input_length" : 50
      },
      "updateTime" : {
        "type" : "date"
      }
    }
  }
}
在ItemDoc模型类中添加自动补全字段。
//自动补全字段suggestion
@ApiModelProperty("自动补全字段")
private List<String> suggestion;
完整的模型类如下:
package com.hmall.item.domain.po;

import co.elastic.clients.elasticsearch._types.mapping.FieldType;
import io.swagger.annotations.ApiModel;
import io.swagger.annotations.ApiModelProperty;
import lombok.Data;
import org.springframework.data.elasticsearch.core.geo.GeoPoint;

import java.time.LocalDateTime;
import java.util.List;

@Data
@ApiModel(description = "索引库实体")
public class ItemDoc {

    @ApiModelProperty("商品id")
    private String id;

    @ApiModelProperty("商品名称")
    private String name;

    @ApiModelProperty("价格(分)")
    private Integer price;

    @ApiModelProperty("库存")
    private Integer stock;

    @ApiModelProperty("商品图片")
    private String image;

    @ApiModelProperty("类目名称")
    private String category;

    @ApiModelProperty("品牌名称")
    private String brand;

    @ApiModelProperty("销量")
    private Integer sold;

    @ApiModelProperty("评论数")
    private Integer commentCount;

    @ApiModelProperty("是否是推广广告,true/false")
    private Boolean isAD;

    @ApiModelProperty("更新时间")
    private LocalDateTime updateTime;

    @ApiModelProperty("地理坐标")
    private GeoPoint location;

    //商品属性
    @ApiModelProperty("商品规格")
    private List<Spec> attr_list;

    //自动补全字段suggestion
    @ApiModelProperty("自动补全字段")
    private List<String> suggestion;

    @Data
    public static class Spec {
        private String name;
        private String value;
    }
}
使用批量导入程序向items索引结构中导入数据
自动补全字段的值为:商品品牌、商品分类。参考代码如下:
@Test
void testBatchAddDocment() throws Exception {

    int pageNo = 0;

    while (true) {

        //取第一页10条数据
        Page<Item> page = Page.of(pageNo, 100);

        //查询所有商品信息
        Page<Item> itemPage = itemService.page(page, new LambdaQueryWrapper<Item>());
        List<Item> items = itemPage.getRecords();
        if (CollectionUtils.isEmpty(items)) {
            break;
        }

        //拷贝属性
        List<ItemDoc> itemDocs = BeanUtils.copyList(items, ItemDoc.class);

        //批量添加请求
        BulkRequest.Builder br = new BulkRequest.Builder();
        itemDocs.forEach(itemDoc ->
                br.operations(op -> op
                        .index(i -> i
                                .index("items197")
                                .id(itemDoc.getId().toString())
                                .document(itemDoc))));
        //构建请求
        BulkRequest build = br.build();
        //批量添加
        BulkResponse bulkResponse = esClient.bulk(build);

        pageNo++;
    }
}
数据导入完成测试completion效果:
1) 输入拼音测试自动补全效果
GET /items/_search
{
  "suggest" : {
    "text":"la",
    "suggestion_suggest" : {
      "completion" : {
        "field" : "suggestion",
        "size" : 10,
        "skip_duplicates" : true
      }

    }
  }
}
2)输入中文测试自动补全效果
GET /items/_search
{
  "suggest" : {
    "text":"拉",
    "suggestion_suggest" : {
      "completion" : {
        "field" : "suggestion",
        "size" : 10,
        "skip_duplicates" : true
      }

    }
  }
}
定义自动补全接口,前端通过此接口获取补全关键字[接口请保持一致]
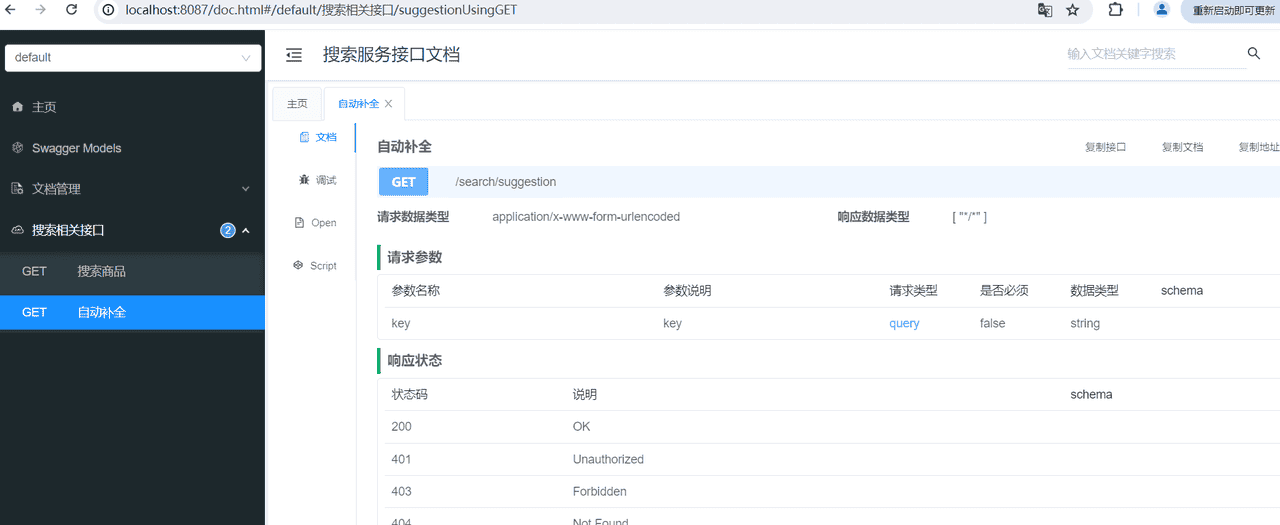
响应结果:字符串数组。
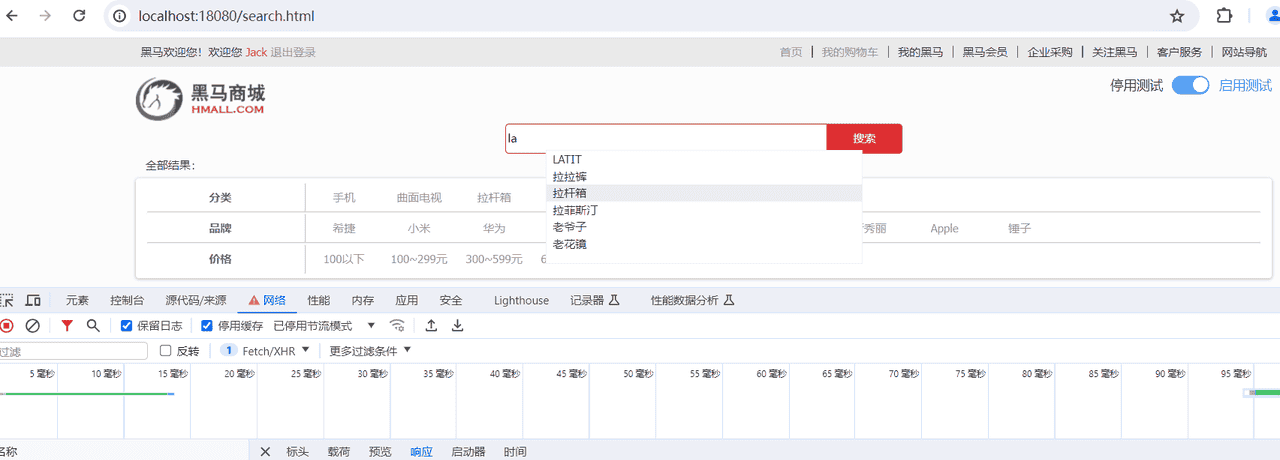
测试
测试效果


暂无评论内容