
1. 部署过程
- 调整三台服务器的系统配置参数
- 修改es配置文件
- 分配集群间的通信证书
- 再调整用户组权限
- 最后创建三个容器搭建集群
- 涉及的主机:172.20.107.240、172.20.107.241、172.20.107.242
2. 系统配置参数
#编辑系统核心参数主配置文件
vim /etc/sysctl.conf
#修改系统级文件描述符上限和进程内存映射区域上限
fs.file-max=655360
vm.max_map_count = 262144
#编辑用户级资源限制配置文件
vim /etc/security/limits.conf
#在文件最后添加如下内容
root hard nofile 65536
root soft nofile 65536
nts hard nofile 65536
nts soft nofile 65536
nts hard nproc 65536
nts soft nproc 65536
nts hard memlock unlimited
nts soft memlock unlimited
canal hard nofile 65535
canal soft nofile 65535
#刷新生效配置
sysctl -p
3. 修改 es 配置文件
#修改配置文件的node.name和discovery.seed_hosts
vim /home/midware/elasticsearch/config/elasticsearch.yml
4. 创建通信证书
es集群之间的通信需要集群认证证书,在创建容器前先要准备证书。
#在三台服务器上创建证书目录
mkdir -p /home/midware/elasticsearch/config/certs
#在其中一个节点生成证书
docker run --rm -v /home/midware/elasticsearch/config/certs:/certs
  elasticsearch:7.17.27
  bin/elasticsearch-certutil cert -out /certs/elastic-certificates.p12 -pass ''
#设置证书权限
chmod 640 /home/midware/elasticsearch/config/certs/elastic-certificates.p12
#分发证书到另外两个节点
scp /home/midware/elasticsearch/config/certs/elastic-certificates.p12 root@172.20.107.241:/home/midware/elasticsearch/config/certs

scp /home/midware/elasticsearch/config/certs/elastic-certificates.p12 root@172.20.107.242:/home/midware/elasticsearch/config/certs
5. 调整用户组权限(可跳过)
es是强制要求严格用户隔离的中间件,容器默认以uid=1000运行(非root)。但是在之前部署其他中间件的过程中,1000这个默认的uid可能已经被其他的容器占用(可通过vim /etc/group查看)。若发现1000已经被使用的话,就不做修改,避免影响已在运行的容器(很可能导致数据库连接失败、服务崩溃)。所以推荐的做法是,单独创建一个未被使用的用户组作为es的专用用户组,这里选用2000:2000。
#创建es专用组
groupadd -g 2000 elasticsearch
#创建es专用用户
useradd -r -s /bin/false -u 2000 -g 2000 elasticsearch
#设置目录权限
chown -R 2000:2000 /home/midware/elasticsearch
6. 启动容器
由于启动的命令大体上差不多,以下是172.20.107.240 的启动脚本,可自行修改后,到另外两台执行,修改参数:network.host、node.name
docker run -d
--name es-node1
--network host
--cap-add IPC_LOCK
--ulimit memlock=-1:-1
-u "2000:2000"
-e TAKE_FILE_OWNERSHIP=true
-e cluster.name=es-cluster
-e network.host=172.20.107.240
-e node.name=node1
-e node.master=true
-e node.data=true
-e discovery.seed_hosts=172.20.107.240,172.20.107.241,172.20.107.242
-e cluster.initial_master_nodes=node1,node2,node3
-e ES_JAVA_OPTS="-Xms2048m -Xmx2048m"
-e ELASTICSEARCH_USERNAME=elastic
-e ELASTIC_PASSWORD=3er4#ER$
-e xpack.security.enabled=true
-e xpack.security.transport.ssl.enabled=true
-e xpack.security.transport.ssl.verification_mode=certificate
-e xpack.security.transport.ssl.keystore.path=certs/elastic-certificates.p12
-e xpack.security.transport.ssl.truststore.path=certs/elastic-certificates.p12
-e LC_ALL=C.UTF-8
-e LANG=C.UTF-8
-v "/home/midware/elasticsearch/config:/usr/share/elasticsearch/config"
-v "/home/midware/elasticsearch/data:/usr/share/elasticsearch/data"
-v "/home/midware/elasticsearch/plugins:/usr/share/elasticsearch/plugins"
-v "/home/midware/elasticsearch/logs:/usr/share/elasticsearch/logs"
--memory 4g
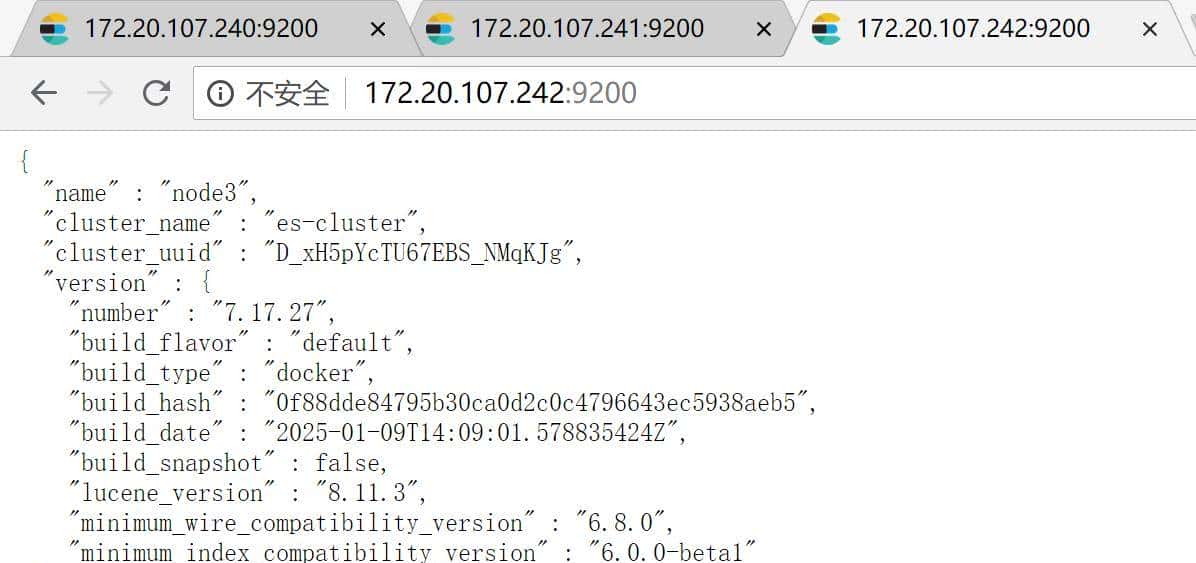
elasticsearch:7.17.277. 检验集群健康状态
等待两分钟左右,待节点之间完成通信。
curl -u "elastic:3er4#ER$" http://172.10.107.240:9200/_cluster/health?pretty
或者在浏览器进行检查,账号elastic,密码 3er4#ER$。
© 版权声明
文章版权归作者所有,未经允许请勿转载。如内容涉嫌侵权,请在本页底部进入<联系我们>进行举报投诉!
THE END


暂无评论内容