
手动下载安装
由于我使用的是MacOS电脑,所以这里 使用MacOS 演示安装Docker。
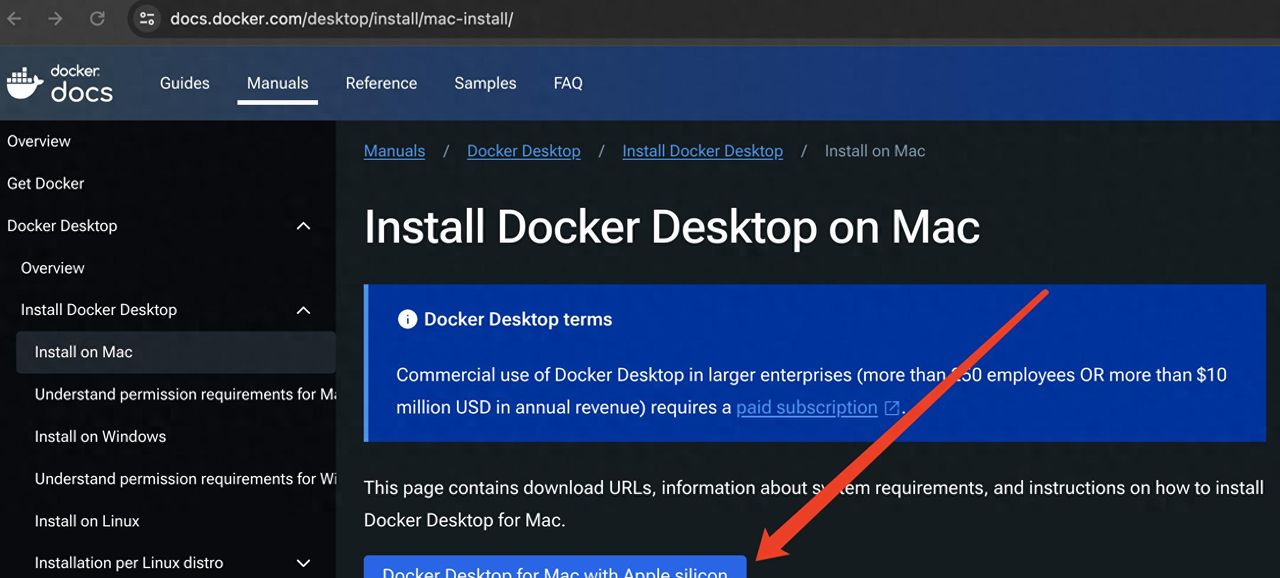
手动下载,请点击以下链接下载Install Docker Desktop on Mac | Docker Docs。
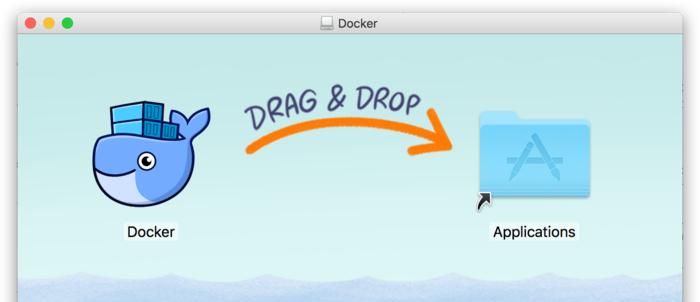
如同 macOS 其它软件一样,安装也超级简单,双击下载的 .dmg 文件,然后将鲸鱼图标拖拽到 Application 文件夹即可。
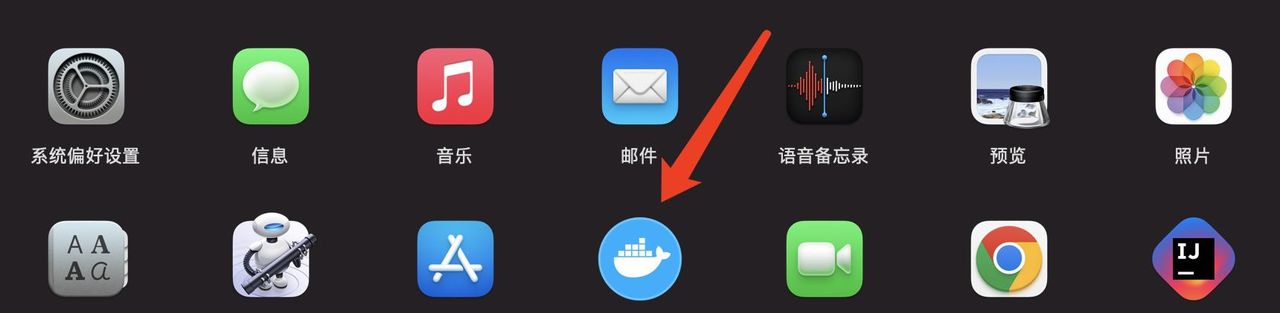
从应用中找到 Docker 图标并点击运行。可能会询问 macOS 的登陆密码,输入即可。
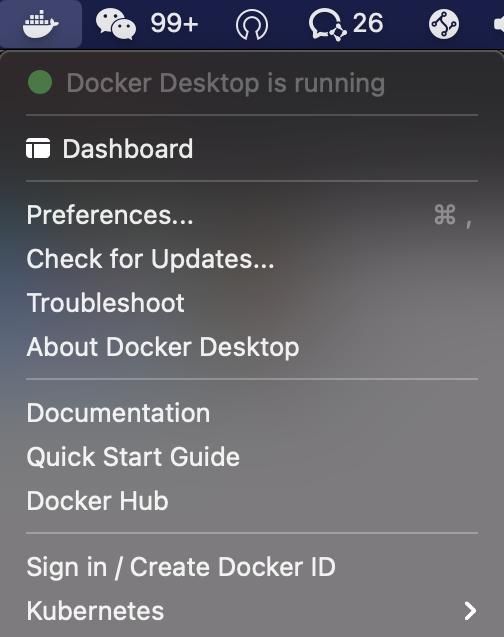
点击顶部状态栏中的鲸鱼图标会弹出操作菜单。

第一次点击图标,可能会看到这个安装成功的界面,点击 “Got it!” 可以关闭这个窗口。
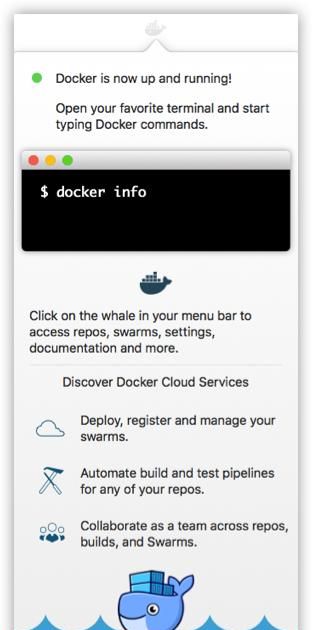
启动终端后,通过命令可以检查安装后的 Docker 版本。
使用命令 docker -v 或 docker –version
a123456@luludeMacBook-Pro-2 bin % docker -v
Docker version 20.10.8, build 3967b7d
a123456@luludeMacBook-Pro-2 bin % docker --version
Docker version 20.10.8, build 3967b7d运行hello-world
a123456@luludeMacBook-Pro-2 Dockerfile % docker run hello-world
Unable to find image 'hello-world:latest' locally
latest: Pulling from library/hello-world
c1ec31eb5944: Pull complete
Digest: sha256:53641cd209a4fecfc68e21a99871ce8c6920b2e7502df0a20671c6fccc73a7c6
Status: Downloaded newer image for hello-world:latest

Hello from Docker!
This message shows that your installation appears to be working correctly.

To generate this message, Docker took the following steps:
 1. The Docker client contacted the Docker daemon.
 2. The Docker daemon pulled the "hello-world" image from the Docker Hub.
    (amd64)
 3. The Docker daemon created a new container from that image which runs the
    executable that produces the output you are currently reading.
 4. The Docker daemon streamed that output to the Docker client, which sent it
    to your terminal.

To try something more ambitious, you can run an Ubuntu container with:
 $ docker run -it ubuntu bash

Share images, automate workflows, and more with a free Docker ID:
 https://hub.docker.com/

For more examples and ideas, visit:
 https://docs.docker.com/get-started/
镜像加速
国内从 DockerHub 拉取镜像有时会遇到困难,此时可以配置镜像加速器。Docker 官方和国内许多云服务商都提供了国内加速器服务,例如:
- 科大镜像:https://docker.mirrors.ustc.edu.cn/
- 网易:https://hub-mirror.c.163.com/
- 阿里云:https://<你的ID>.mirror.aliyuncs.com
- 七牛云加速器:https://reg-mirror.qiniu.com
当配置某一个加速器地址之后,若发现拉取不到镜像,请切换到另一个加速器地址。国内各大云服务商均提供了 Docker 镜像加速服务,提议根据运行 Docker 的云平台选择对应的镜像加速服务。
我使用的是网易的镜像地址 和 阿里云的镜像地址
http://hub-mirror.c.163.com
https://qpc4mmbo.mirror.aliyuncs.com/。
在任务栏点击 Docker for mac 应用图标 -> Perferences -> Docker Engine 。在JSON中填写加速器地址即可。修改完成之后,点击 Apply & Restart 按钮,Docker 就会重启并应用配置的镜像地址了。
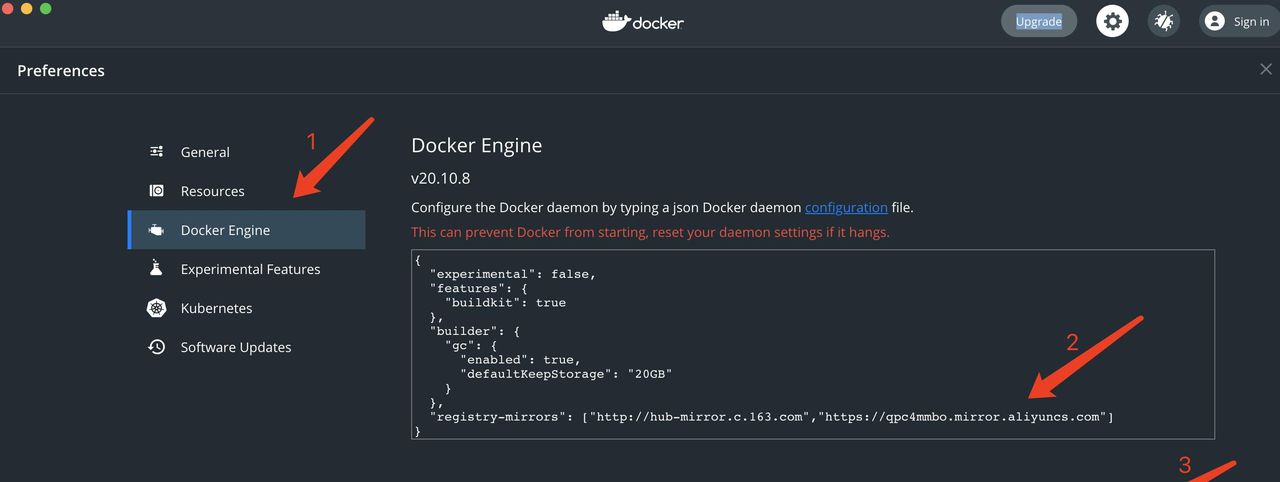
{
  "experimental": false,
  "features": {
    "buildkit": true
  },
  "builder": {
    "gc": {
      "enabled": true,
      "defaultKeepStorage": "20GB"
    }
  },
  "registry-mirrors": ["http://hub-mirror.c.163.com","https://qpc4mmbo.mirror.aliyuncs.com"]
}
检查加速器是否生效配置加速器之后,如果拉取镜像依旧十分缓慢,请手动检查加速器配置是否生效,在命令行执行 docker info,如果从结果中看到了如下内容,说明配置成功。
a123456@luludeMacBook-Pro-2 bin % docker info
Client:
 Context:    default
 Debug Mode: false
 Plugins:
  buildx: Build with BuildKit (Docker Inc., v0.6.3)
  compose: Docker Compose (Docker Inc., v2.0.0)
  scan: Docker Scan (Docker Inc., v0.8.0)

Server:
 Containers: 4
  Running: 1
  Paused: 0
  Stopped: 3
 Images: 4
 Server Version: 20.10.8
 Storage Driver: overlay2
  Backing Filesystem: extfs
  Supports d_type: true
  Native Overlay Diff: true
  userxattr: false
 Logging Driver: json-file
 Cgroup Driver: cgroupfs
 Cgroup Version: 1
 Plugins:
  Volume: local
  Network: bridge host ipvlan macvlan null overlay
  Log: awslogs fluentd gcplogs gelf journald json-file local logentries splunk syslog
 Swarm: inactive
 Runtimes: io.containerd.runc.v2 io.containerd.runtime.v1.linux runc
 Default Runtime: runc
 Init Binary: docker-init
 containerd version: e25210fe30a0a703442421b0f60afac609f950a3
 runc version: v1.0.1-0-g4144b63
 init version: de40ad0
 Security Options:
  seccomp
   Profile: default
 Kernel Version: 5.10.47-linuxkit
 Operating System: Docker Desktop
 OSType: linux
 Architecture: x86_64
 CPUs: 2
 Total Memory: 1.94GiB
 Name: docker-desktop
 ID: CXVD:YXMM:COF5:XW2G:ET45:SOZR:XJOY:K32H:5N5B:JLTE:UP5A:6LKX
 Docker Root Dir: /var/lib/docker
 Debug Mode: false
 HTTP Proxy: http.docker.internal:3128
 HTTPS Proxy: http.docker.internal:3128
 Registry: https://index.docker.io/v1/
 Labels:
 Experimental: false
 Insecure Registries:
  127.0.0.0/8
 Registry Mirrors:
  http://hub-mirror.c.163.com/
  https://qpc4mmbo.mirror.aliyuncs.com/
 Live Restore Enabled: false
$ docker info
Registry Mirrors:
http://hub-mirror.c.163.com/
https://qpc4mmbo.mirror.aliyuncs.com/Docker 原理
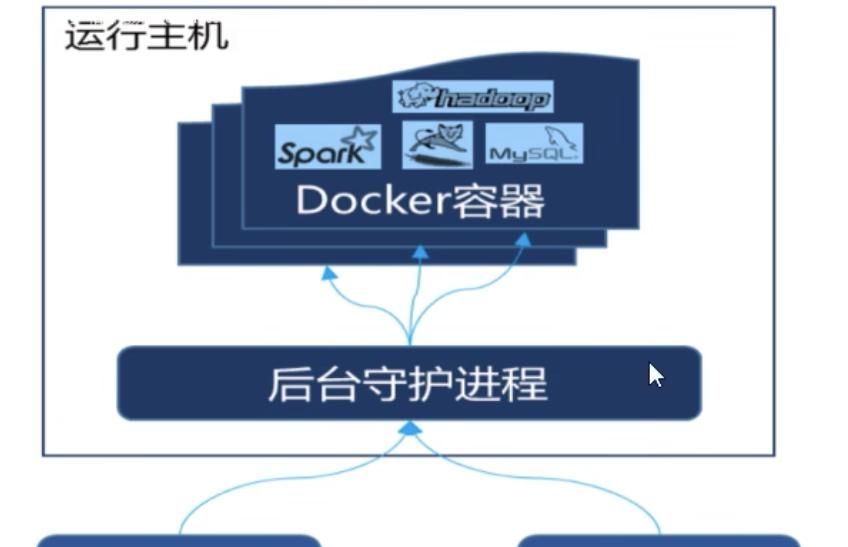
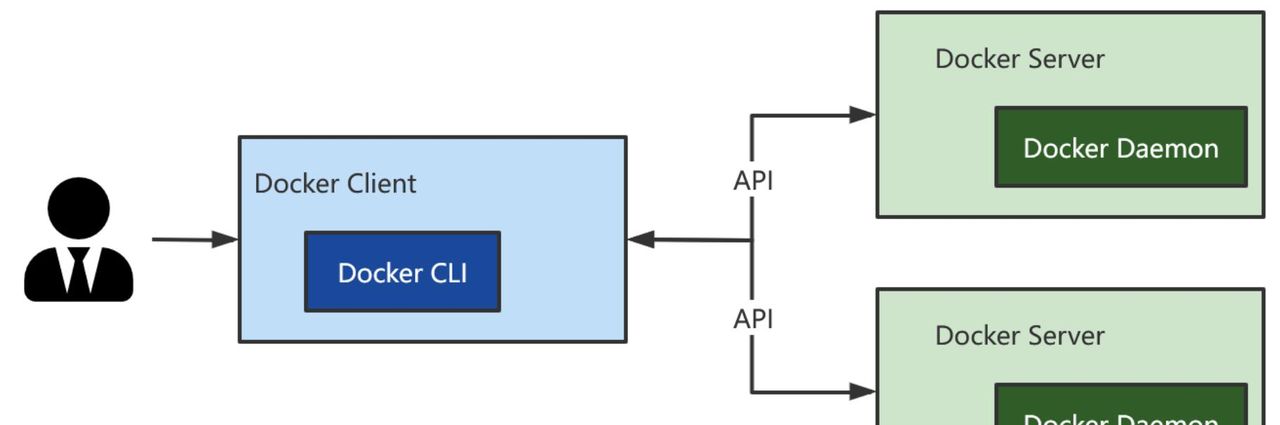
Docker是一个Client-Server结构的系统,Docker的守护进程运行在主机上,然后通过Scoket连接从客户端访问。守护进程从客户端接收命令并管理运行在主机上的容器。容器是一个运行时环境。
在Docker架构中:
- Docker Client:客户端就是Docker命令行工具;用户直接操作Client,由Client向Server发送请求。
- Docker Server:服务器端就是Docker守护进程(Docker daemon),它接收Client的请求,直接操作Docker组件,然后返回响应给Client.
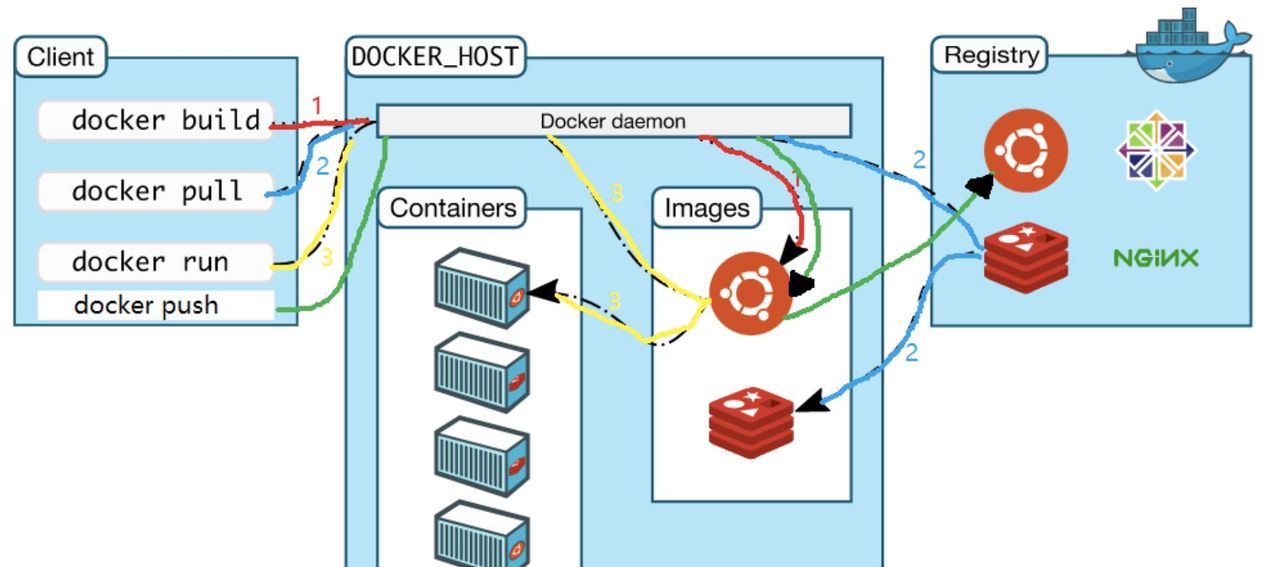
客户端和服务端是通过REST API交互的:


暂无评论内容